The Latest in

ICT Articles & Tutorials

World ICT News is a professional platform dedicated to Artificial Intelligence, Cloud Computing, DevOps, and Cybersecurity. Empowering the next generation of ICT specialists. Our exclusive tutorials and articles are designed to serve as a stepping stone for you into the world of ICT industry...

A Comprehensive Guide to Digital Forensics in Cybersecurity
May 29, 2026
7 min read

A Comprehensive Guide to Digital Forensics in Cybersecurity

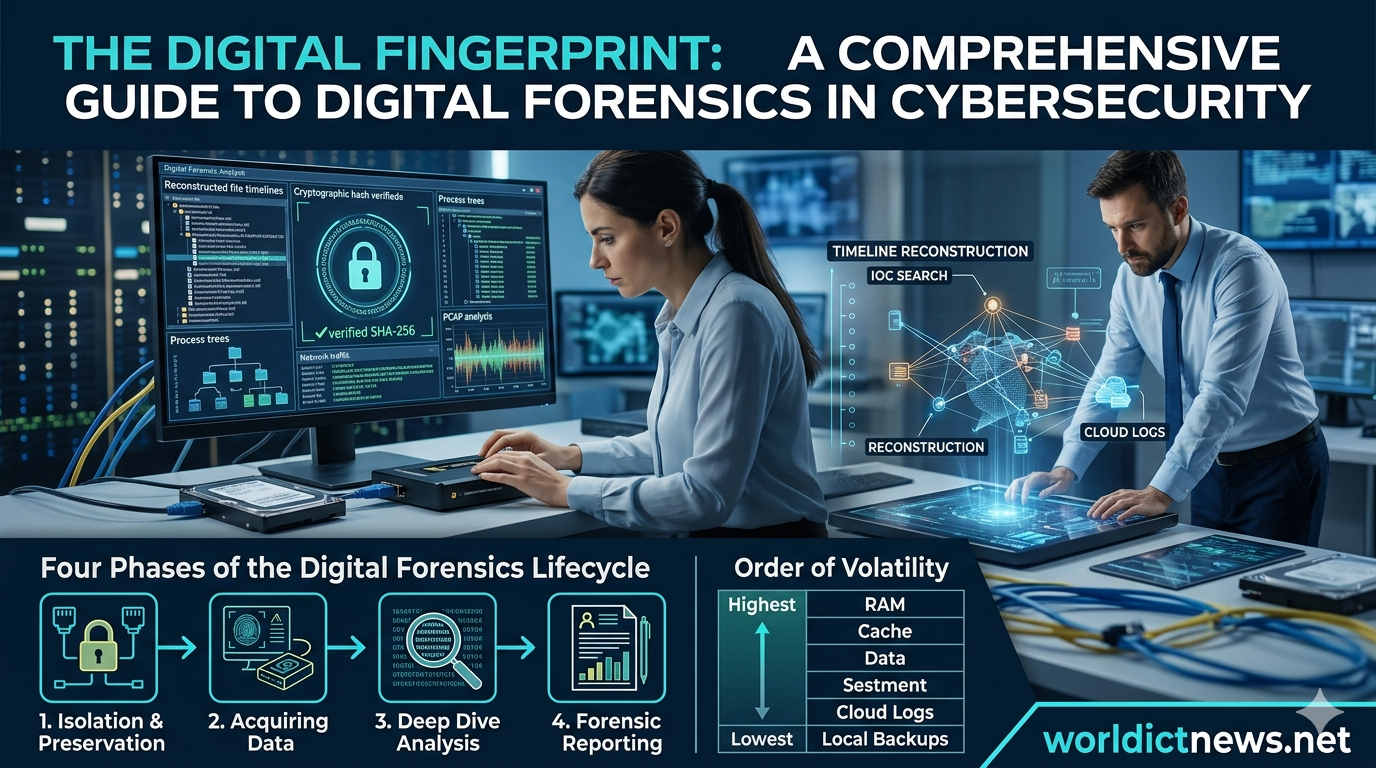
The Digital Fingerprint: A Comprehensive Guide to Digital Forensics in Cybersecurity. When a cyberattack breaches an enterprise network, security teams cannot rely on guesswork. They must determine exactly how the threat actor entered, what files were accessed, and what data left the perimeter.This is the domain of Digital Forensics and Incident Response (DFIR). Digital forensics bridges the gap between raw computer science and data-driven investigation. It applies rigorous, scientifically sound methods to collect, preserve, analyze, and present digital evidence in ways that are legally admissible in court.As corporate networks grow more complex, digital forensics has transformed from a post-event investigation tool into a core pillar of modern cybersecurity defenses.The Intersection of Cybersecurity and Digital ForensicsWhile standard cybersecurity focuses on defense, monitoring, and mitigating active attacks, digital forensics focuses on historical reconstruction.Cybersecurity (The Shield): Deploys firewalls, configures Endpoint Detection and Response (EDR) agents, and manages active system configurations to block incoming threats.Digital Forensics (The Detective): Intervenes during or after a security failure to reverse-engineer the attacker's timeline and secure evidence without altering underlying system states. [ CYBERSECURITY ] [ DIGITAL FORENSICS ] ─── ── • Active Threat Blocking • Post-Breach Reconstruction • Access Control & Patching • Root-Cause Analysis • Real-Time Traffic Scanning • Legal Evidence PreservationIntegrating digital forensics directly into a security posture drastically reduces an organization's Mean Time to Resolution (MTTR). By tracking exactly how a vulnerability was exploited, security architecture teams can deploy precise patches, preventing attackers from using the same entry point twice.The Four Phases of the Digital Forensics LifecycleDigital forensic investigations follow strict, standardized frameworks established by organizations like the National Institute of Standards and Technology (NIST). Deviating from these phases can corrupt data, making the evidence useless in legal proceedings or regulatory compliance audits. ┌────┐ ┌─────┐ ┌───┐ ┌────┐ │ 1. Isolation │ ───> │ 2. Acquiring │ ───> │ 3. Deep Dive │ ───> │ 4. Forensic │ │ & Collection │ │ Data │ │ Analysis │ │ Reporting │ └────┘ └─────┘ └───┘ └────┘1. Isolation and PreservationThe moment an incident is declared, the compromised machine must be isolated from the network to stop command-and-control (C2) communication. This must be done carefully to avoid changing the target machine's data.Investigators must document the system's exact state using a clear chain-of-custody log. This log tracks every person who interacts with the hardware or digital images, along with exact timestamps.2. Acquiring DataForensic professionals never run analysis tools directly on live production systems. Instead, they capture a perfect, bit-by-bit duplicate of the digital storage media, known as a forensic image.To maintain data integrity, investigators use hardware write-blockers. These devices physically prevent the workstation from modifying any data on the target storage drive during the imaging process.Once imaging is complete, the investigator calculates cryptographic hash values (such as SHA-256) for both the original drive and the new copy. If the hashes match perfectly, the image is verified as a true copy, and analysis can safely begin.3. Deep-Dive AnalysisWith verified copies in hand, investigators use advanced forensic software to search for indicators of compromise (IOCs). They hunt for hidden partitions, parse system registry hives, rebuild fragmented event logs, and extract deleted files from unallocated drive space.4. Forensic ReportingThe final phase translates complex technical findings into a clear, structured report. The document must outline the investigation's scope, the specific tools used, the artifacts recovered, and the ultimate root-cause conclusion. This report must be written so that non-technical business executives, compliance officers, and legal teams can fully understand the timeline of events.Order of Volatility: Tracking Modern Digital ArtifactsData disappears at different rates during an active investigation. When analyzing a system, investigators prioritize collecting evidence based on the Order of Volatility. They gather highly fleeting data first before it is overwritten or lost when the system powers down.Volatility RankData ClassificationPractical Forensic Artifacts1 (Highest)CPU Registers & CacheActive processor instructions, real-time memory states2System Memory (RAM)Decryption keys, unencrypted passwords, running processes3Network StatesActive TCP/UDP connections, open routing tables, ARP cache4Local Storage DrivesOperating system files, application logs, registry hives5 (Lowest)Remote BackupsOffsite cloud storage archives, optical media, cold backupsWhy Volatile RAM Analysis MattersHistorically, computer forensics focused mainly on reading non-volatile hard drives. However, modern malware often runs entirely in memory without writing files to the disk.Extracting and analyzing a volatile RAM dump allows investigators to recover active encryption keys, find malicious injected code segments, and see open network connections that disappear entirely when the machine reboots.Core Specialized Sub-DisciplinesDigital forensics covers several specialized domains, each requiring distinct investigative toolsets and technical expertise.Network ForensicsNetwork forensics analyzes traffic logs, packet captures (PCAPs), and firewall indicators to monitor data moving across an enterprise network. Investigators review these logs to trace data exfiltration paths, pinpoint lateral movement within a network, and determine exactly how much data an attacker stolen.Endpoint and Host ForensicsThis branch focuses on analyzing individual workstations, laptops, and enterprise servers. Investigators inspect operating system artifacts like Windows Prefetch files, Shimcache, and Shellbags to verify whether specific malicious programs were executed on a user's machine.Cloud ForensicsAs companies move infrastructure to cloud platforms like AWS, Azure, and Google Cloud, investigators must adapt to decentralized environments. Cloud forensics relies heavily on reviewing centralized infrastructure tracking logs (like AWS CloudTrail). This allows investigators to reconstruct identity-based attacks and API exploitation without needing physical access to server hardware.Mobile Device ForensicsMobile devices require unique extraction methods because they rely on hardware-level encryption and specialized flash memory layouts. Investigators use advanced techniques to bypass device locks, allowing them to recover deleted text messages, encrypted chat logs, and geolocation history.Essential Forensic Tools Used by Industry ProfessionalsModern forensic examiners use a mix of commercial suites and open-source utilities to conduct comprehensive investigations.Autopsy / Sleuth Kit: A widely used open-source graphical interface that parses hard drives, extracts web browser histories, and flags hidden file types.FTK Imager (Forensic Toolkit): An industry-standard utility designed to acquire highly accurate forensic images of storage drives and volatile system RAM.Volatility Framework: A powerful, open-source command-line tool used worldwide to analyze memory dumps and reverse-engineer in-memory malware.EnCase Forensic: A comprehensive commercial enterprise suite utilized heavily by law enforcement for deep index searching, metadata triage, and formal report generation.Overcoming Modern Forensic ChallengesThe digital forensics landscape faces continuous challenges as technology evolves and attackers deploy anti-forensic techniques.1. Widespread End-to-End EncryptionWhile strong encryption protects user privacy, it presents a hurdle for traditional forensic investigations. If an attacker communicates using encrypted channels or targets an enterprise drive protected by full-disk encryption, investigators cannot read the data without securing the decryption keys directly from active system memory or user configurations.2. Anti-Forensics TacticsModern threat actors actively use anti-forensic techniques to hide their tracks. These tactics include:Timestomping: Artificially modifying file creation and modification timestamps to disrupt the investigator's timeline analysis.Log Clearing: Explicitly erasing Windows Event logs or Linux syslog records immediately after gaining administrative access.Fileless Malware: Executing scripts directly within legitimate administrative utilities (like PowerShell) to avoid generating traditional file artifacts on the hard drive.3. The Scale of Big DataModern storage capacities have grown exponentially. Investigating a breach across dozens of multi-terabyte corporate servers can generate petabytes of raw data. Forensic teams rely on automated ingestion scripts, artificial intelligence filters, and targeted keyword indexing to quickly parse through data volumes and locate critical evidence.ConclusionDigital forensics is an essential component of modern cybersecurity defense. By combining structured investigative processes with deep system analysis, digital forensic professionals help organizations accurately reconstruct cyberattacks, protect data integrity, and build resilient defenses.As cyber threats become more sophisticated, the ability to analyze and interpret digital evidence remains our strongest asset for securing the digital landscape.
Steps to Building a Dynamic JavaScript Countdown Clock
May 29, 2026
8 min read

Steps to Building a Dynamic JavaScript Countdown Clock

Building a Dynamic JavaScript Countdown Clock for Months, Days, Minutes, and Seconds. Event organizers, e-commerce brands, and web developers frequently rely on countdown clocks to drive user engagement and build excitement. Whether you are counting down to a product launch, a music festival, or a holiday sale, an accurate digital timer introduces a psychological element of scarcity and urgency.While basic countdown scripts that calculate only days, hours, minutes, and seconds are widely available, creating a timer that dynamically accounts for months introduces a unique programming challenge. Because months vary in length (28, 29, 30, or 31 days), a standard fixed-millisecond division fails over longer periods.This comprehensive technical guide details how to construct a robust, highly accurate JavaScript countdown clock that calculates shifting calendar months alongside days, hours, minutes, and seconds.The Architectural Challenge of Shifting Month LengthsMost internet countdown tutorials use simple millisecond math to break down time intervals:One second:millisecondsOne minute:millisecondsOne hour:millisecondsOne day:millisecondsThis linear approach collapses when applied to calendar months. A month is not a fixed unit. Dividing a large block of milliseconds by a static number likedays yields compounding precision errors, causing your countdown to display incorrect values as it nears the target date.The Dynamic Calendar Comparison SolutionTo solve this, our JavaScript architecture must abandon raw millisecond division for long-term values. Instead, it will use native Date object methods to compare the structural difference between the current calendar date and the target event date. This calculation accurately accounts for varying month lengths and leap years.Section 1: Structuring the HTML InterfaceA clean web interface requires semantic, organized markup. We will encapsulate the countdown clock inside an explicit container, isolating each time unit into its own modular block for easy manipulation and styling.html<!DOCTYPE html><html lang="en"><head> <meta charset="UTF-8"> <meta name="viewport" content="width=device-width, initial-scale=1.0"> <title>Dynamic Event Countdown Clock</title> <link rel="stylesheet" href="style.css"></head><body> <div class="countdown-container"> <h2 id="event-title">Grand Product Launch Countdown</h2> <div id="countdown-clock"> <div class="time-block"> <span class="time-value" id="months">00</span> <span class="time-label">Months</span> </div> <div class="time-block"> <span class="time-value" id="days">00</span> <span class="time-label">Days</span> </div> <div class="time-block"> <span class="time-value" id="hours">00</span> <span class="time-label">Hours</span> </div> <div class="time-block"> <span class="time-value" id="minutes">00</span> <span class="time-label">Minutes</span> </div> <div class="time-block"> <span class="time-value" id="seconds">00</span> <span class="time-label">Seconds</span> </div> </div> <div id="fallback-message" class="hidden">The event has arrived!</div> </div> <script src="script.js"></script></body></html>Use code with caution.Section 2: Crafting Responsive CSS VisualsTo ensure the layout remains highly readable on mobile devices and large desktop displays, we will apply an optimized modern flexbox layout accompanied by stark, scannable visual anchors.css/* Reset and Base Styles */* { box-sizing: border-box; margin: 0; padding: 0;}body { font-family: -apple-system, BlinkMacSystemFont, "Segoe UI", Roboto, Helvetica, Arial, sans-serif; background-color: #0f172a; color: #f8fafc; display: flex; justify-content: center; align-items: center; min-height: 100vh;}/* Container Card */.countdown-container { background-color: #1e293b; padding: 2.5rem; border-radius: 1rem; box-shadow: 0 20px 25px -5px rgba(0, 0, 0, 0.3), 0 10px 10px -5px rgba(0, 0, 0, 0.04); text-align: center; max-width: 90%; width: 600px;}#event-title { font-size: 1.75rem; margin-bottom: 2rem; font-weight: 700; letter-spacing: -0.025em; color: #38bdf8;}/* Clock Flexbox Layout */#countdown-clock { display: flex; justify-content: space-between; gap: 1rem; flex-wrap: wrap;}.time-block { flex: 1; min-width: 90px; background-color: #0f172a; padding: 1rem 0.5rem; border-radius: 0.5rem; border: 1px solid #334155;}.time-value { display: block; font-size: 2.5rem; font-weight: 800; color: #f43f5e; line-height: 1; margin-bottom: 0.5rem;}.time-label { font-size: 0.75rem; text-transform: uppercase; letter-spacing: 0.1em; color: #94a3b8; font-weight: 600;}/* State Management Styles */.hidden { display: none !important;}#fallback-message { font-size: 1.5rem; font-weight: bold; color: #10b981; margin-top: 1rem;}/* Responsive Adjustments */@media (max-width: 480px) { #countdown-clock { gap: 0.5rem; } .time-block { min-width: 70px; padding: 0.75rem 0.25rem; } .time-value { font-size: 1.75rem; }}Use code with caution.Section 3: The Complete JavaScript ImplementationBelow is the complete, modular production-grade JavaScript script designed to parse calendar logic accurately, safely account for end-of-month boundaries, and automatically scale time units downward.javascript/** * Dynamic JavaScript Event Countdown Clock * Formats time remaining in precise Months, Days, Hours, Minutes, and Seconds */// Define your target event date here (ISO 8601 Format Recommended)const TARGET_DATE_STR = "2026-12-31T23:59:59";const targetDate = new Date(TARGET_DATE_STR);// DOM Elements Selectionconst elMonths = document.getElementById("months");const elDays = document.getElementById("days");const elHours = document.getElementById("hours");const elMinutes = document.getElementById("minutes");const elSeconds = document.getElementById("seconds");const clockContainer = document.getElementById("countdown-clock");const fallbackMessage = document.getElementById("fallback-message");/** * Calculates the complex calendar delta between two timestamps * @param {Date} now - Current time reference * @param {Date} target - Future event time reference * @returns {Object|null} Formatted time components or null if expired */function calculateCalendarTimeRemaining(now, target) { if (target - now <= 0) { return null; } // Step 1: Create iterative calendar date states let currentYear = now.getFullYear(); let currentMonth = now.getMonth(); // 0-indexed (Jan = 0) // Preliminary difference in months let monthDiff = (target.getFullYear() - currentYear) * 12 + (target.getMonth() - currentMonth); // Establish a virtual processing point advanced by the calculated months let testDate = new Date(now.getTime()); testDate.setMonth(testDate.getMonth() + monthDiff); // Step 2: Handle overflow adjustments // If advancing month past target overshoots the absolute timestamp, step back one month if (testDate > target) { monthDiff--; testDate = new Date(now.getTime()); testDate.setMonth(testDate.getMonth() + monthDiff); } // Step 3: Extract the remaining time from the adjusted virtual base date let timeDelta = target.getTime() - testDate.getTime(); // Standard static math breakdown for sub-day components const msInSecond = 1000; const msInMinute = msInSecond * 60; const msInHour = msInMinute * 60; const msInDay = msInHour * 24; let days = Math.floor(timeDelta / msInDay); timeDelta %= msInDay; let hours = Math.floor(timeDelta / msInHour); timeDelta %= msInHour; let minutes = Math.floor(timeDelta / msInMinute); timeDelta %= msInMinute; let seconds = Math.floor(timeDelta / msInSecond); return { months: monthDiff, days: days, hours: hours, minutes: minutes, seconds: seconds };}/** * Prepends a leading zero to single-digit numbers for visual alignment * @param {number} value - The number to pad * @returns {string} Zero-padded string */function padTimeValue(value) { return String(value).padStart(2, "0");}/** * Updates the graphical user interface elements with new time calculations */function updateCountdownDisplay() { const now = new Date(); const remainingTime = calculateCalendarTimeRemaining (now, targetDate); if (remainingTime === null) { // Stop updating, hide clock container, display completion state clearInterval(countdownIntervalId); clockContainer.classList.add("hidden"); fallbackMessage.classList.remove ("hidden"); return; } // Inject calculated components into DOM elMonths.textContent = padTimeValue(remainingTime.months); elDays.textContent = padTimeValue(remainingTime.days); elHours.textContent = padTimeValue(remainingTime.hours); elMinutes.textContent = padTimeValue(remainingTime.minutes); elSeconds.textContent = padTimeValue(remainingTime.seconds);}// Execute initial rendering immediately to prevent visible layout shift on loadupdateCountdownDisplay();// Establish stable 1-second background rendering threadconst countdownIntervalId = setInterval(updateCountdownDisplay, 1000);Use code with caution.Section 4: Deep Dive Code BreakdownTo effectively customize or modify this application, you must understand its underlying algorithmic structure.The Virtual Advance Mechanism (testDate)The core processing innovation happens in lines 22 through 36 of our JavaScript application:javascriptlet monthDiff = (target.getFullYear() - currentYear) * 12 + (target.getMonth() - currentMonth);Use code with caution.This sets up a raw estimation of months remaining. Next, the application dynamically shifts the base current timestamp forward by this calculated number of months.If shifting the date forward overshoots the target timestamp, the script decrements the month count by exactly one. It then re-calculates the remaining fractional time elements using the updated, precise month boundary as its anchor point. This design completely eliminates errors caused by leap years or alternating month lengths.Preventing Initial Content Layout Shifts (CLS)A common problem with naive countdown scripts is a temporary flash of unstyled content (00) on page load. This occurs when the script waits a full second for the first setInterval cycle to fire.Our application explicitly executes updateCountdownDisplay() once globally before initializing the interval framework. This ensures that accurate, parsed data populates the browser DOM instantaneously.Technical Specifications TableReview this feature breakdown to understand how this implementation compares to standard countdown frameworks:Engineering DimensionStandard Linear TimerAdvanced Calendar Timer (This Code)Parsing MethodologyFixed Millisecond DivisionContextual Date Object ComparisonMonth Calculation Error1–3 Days due to variable month lengths0 Days (Always Correct)Leap Year ResilienceFlawed (Fails during February changes)Fully ResilientInitial Page RenderDelayed by 1000msInstantaneous ExecutionLayout Styling StructureMixed HTML Grid RowsComponentized Flexbox LayoutConclusionBy swapping out static mathematical formulas for dynamic calendar tracking, you gain absolute temporal accuracy across long timelines. This script ensures that whether your event is 10 days or 10 months away, the countdown remains perfectly synchronized with actual calendar behavior.
Step-by-Step Guide to Using PSPP in Statistical Analysis
May 29, 2026
7 min read

Step-by-Step Guide to Using PSPP in Statistical Analysis

A Comprehensive, Step-by-Step Guide to Using PSPP in Statistical Analysis. Data analysis is a core pillar of modern research, business intelligence, and academic study. While proprietary tools like IBM SPSS Statistics dominate the landscape, its licensing fees present a significant financial barrier for students, independent researchers, and non-profit organizations.Fortunately, the GNU Project developed PSPP, a completely free, open-source alternative to SPSS. PSPP mirrors the user interface, syntax language, and data organization layout of SPSS, allowing users to transition seamlessly without a steep learning curve.This comprehensive, step-by-step article serves as a practical manual for executing statistical analyses in PSPP. We will cover environment setup, data entry, descriptive statistics, and hypothesis testing—complete with real-world sample questions, step-by-step navigation instructions, and data output interpretations.Understanding the PSPP EnvironmentWhen you open the PSPPire Graphical User Interface (GUI), you are presented with a primary workspace known as the Data Editor. Just like SPSS, this editor features two distinct views toggled at the bottom left-hand corner of the screen:Variable View: The design canvas where you define your variables, configure data types (e.g., numeric, string, date), adjust width, specify decimal places, and assign descriptive labels or value codes.Data View: A spreadsheet-like grid where the rows represent distinct observations (cases/participants) and the columns represent the variables defined in the Variable View.Statistical analysis results do not appear in the Data Editor. Instead, running any statistical command automatically triggers a separate pop-up window known as the Output Viewer, where tables, metrics, and text summaries are formatted for review.Section 1: Setting Up Variables and Entering DataBefore running any test, data must be structured correctly. Let us explore how to build a basic dataset from scratch using a hypothetical research scenario.ScenarioA researcher wants to study the relationship between a person’s biological sex, their age, and their performance on a standard cognitive memory test (scored from 0 to 100).Step-by-Step Dataset Construction1. Define Variables in Variable ViewClick the Variable View tab at the bottom left. Set up three distinct variables in successive rows:Variable 1: SexName: SexType: NumericDecimals: 0Label: Biological Sex of ParticipantValue Labels: Click the ellipsis (...) cell. Add 1 = Male and 2 = Female. This allows PSPP to process categorical data mathematically while displaying readable categories.Measure: NominalVariable 2: AgeName: AgeType: NumericDecimals: 0Label: Age in YearsMeasure: ScaleVariable 3: ScoreName: ScoreType: NumericDecimals: 2Label: Cognitive Test Performance ScoreMeasure: Scale2. Input Observations in Data ViewSwitch to the Data View tab. Enter the raw data points into rows like a conventional spreadsheet:Row (Case)SexAgeScore112185.50222492.00312278.00421988.50513565.00622995.00723189.00812672.50Section 2: Descriptive StatisticsDescriptive statistics summarize and describe the core characteristics of a dataset. They give analysts a bird's-eye view of central tendencies and data distributions.Question 1What are the mean, median, standard deviation, and range of the respondents’ ages and cognitive test scores in our sample?Step-by-Step PSPP ExecutionNavigate to the top menu bar and click AnalyzeDescriptive StatisticsFrequencies.A dialog box will appear. Select Age in Years [Age] and Cognitive Test Performance Score [Score] from the left variable list.Click the arrow button to move them into the Variable(s) column on the right.Click the Statistics button at the bottom of the dialog box.Check the boxes for Mean, Median, Std deviation, Minimum, and Maximum.Click Continue, and then click OK.Output InterpretationThe Output Viewer will generate a summary table resembling the following:MetricAge in YearsCognitive Test Performance ScoreN (Valid)88Mean25.8883.19Median25.0087.00Std. Deviation5.2510.37Minimum1965.00Maximum3595.00Analysis conclusion: The average age of our sample is 25.88 years (with a standard deviation of 5.25), ranging from 19 to 35. The average performance score sits at 83.19 points, showing a relatively tight spread (SD = 10.37) around a median performance of 87.00.Section 3: Comparing Means (Independent Samples t-Test)An independent samples t-test compares the mean scores of two unrelated groups to determine whether there is statistical evidence that the associated population means are significantly different.Question 2Is there a statistically significant difference in cognitive test scores between male and female participants?Step-by-Step PSPP ExecutionGo to the top menu and select AnalyzeCompare MeansIndependent-Samples T Test.Select Cognitive Test Performance Score [Score] and move it into the Test Variable(s) field.Select Biological Sex of Participant [Sex] and move it into the Grouping Variable field.Click Define Groups. Enter 1 for Group 1 (representing Males) and 2 for Group 2 (representing Females).Click Continue, then click OK.Output InterpretationThe output reveals two critical tables: Group Statistics and the Independent Samples Test.Group Statistics Table Summary:Male (N=4): Mean = 75.25; Std. Deviation = 9.35Female (N=4): Mean = 91.13; Std. Deviation = 2.95Independent Samples Test Table Summary:Levene's Test for Equality of Variances: Sig. (p-value) < 0.05 (Variances are unequal, meaning we must read the "Equal variances not assumed" row).t-value: -3.22df (Degrees of Freedom): 3.63Sig. (2-tailed): 0.038Analysis conclusion: Because the 2-tailed significance value (p = 0.038) is less than our standard alpha level of 0.05, we reject the null hypothesis. There is a statistically significant difference between groups: female participants scored significantly higher on the cognitive test than male participants.Section 4: Examining Relationships (Pearson Correlation)Correlation testing determines the strength and direction of a linear relationship between two continuous variables.Question 3Does an individual's age correlate significantly with their cognitive test score?Step-by-Step PSPP ExecutionGo to the top menu and click AnalyzeBivariate Correlation.Select both Age and Score from the left list.Click the arrow button to move them into the Variables box.Ensure the Pearson checkbox is marked under Correlation Coefficients.Keep Two-tailed significance selected.Click OK.Output InterpretationPSPP outputs a symmetrical correlation matrix table:VariableAgeScoreAgePearson CorrelationSig. (2-tailed)N1.008-0.8410.0098ScorePearson CorrelationSig. (2-tailed)N-0.8410.00981.008Analysis conclusion: The Pearson correlation coefficient () between Age and Score is -0.841. The significance value is 0.009, which is well below 0.05. This reveals a strong negative correlation that is statistically highly significant. As age increases, cognitive performance test scores tend to decrease significantly.Section 5: Categorical Data Analysis (Chi-Square Test of Independence)When both variables are nominal or ordinal (categorical), researchers use the Chi-Square test of independence to assess if the variables are associated with one another.Scenario ExpansionImagine expanding the sample to include a new categorical variable: Pass_Fail (1 = Pass, 2 = Fail). We want to know if passing rates differ across biological sexes.Question 4Is there a significant association between biological sex and the likelihood of passing or failing the cognitive evaluation?Step-by-Step PSPP ExecutionGo to the top menu and click AnalyzeDescriptive StatisticsCrosstabs.Move Sex into the Row(s) field.Move Pass_Fail into the Column(s) field.Click the Statistics button on the bottom right of the Crosstabs window.Check the box for Chi-square.Click Continue, and then click OK.Output InterpretationThe Output viewer produces a contingency table and a Chi-Square Tests diagnostic panel.Look closely at the Pearson Chi-Square row.Focus on the Asymp. Sig. (2-sided) column.Analysis conclusion: If the asymptotic significance value is greater than 0.05, you fail to reject the null hypothesis, concluding that biological sex is completely independent of pass/fail rates. Conversely, a value below 0.05 means sex is significantly associated with passing outcomes.Summary Comparison: PSPP vs. SPSSTo understand when to use PSPP over commercial choices, review this operational breakdown:Feature DimensionGNU PSPPIBM SPSS StatisticsLicensing CostCompletely Free (Open-Source)High Premium Commercial FeeInterface SetupDual-view layout (Variable & Data View)Dual-view layout (Variable & Data View)Core FunctionsFrequencies, T-Tests, ANOVA, Linear RegressionAdvanced Predictive Analysis, Neural NetworksPlatform SizeLightweight, runs efficiently on old hardwareHeavy download size, resource-demandingSyntax SupportInterprets SPSS command language directlyNative standard syntax language environmentConclusionPSPP is a powerful, lightweight, and accessible tool for anyone conducting statistical research without a massive software budget. By mastering variable definition, data entry, and core analytical paths—such as descriptives, independent t-tests, Pearson correlations, and cross-tabulations—you can answer complex research questions and extract deep insights from empirical data.
 HTML Elements: Meaning, Anatomy, and Functional Roles
May 27, 2026
9 min read

HTML Elements: Meaning, Anatomy, and Functional Roles

Decoding HTML Elements: Meaning, Anatomy, and Functional Roles. HyperText Markup Language (HTML) is the skeleton of every website on the internet. Without it, web browsers would not know how to display text, render images, or navigate between pages.To build accessible, SEO-friendly, and modern websites, you must understand what HTML elements mean and how they function. This comprehensive guide breaks down the core structural units of the web, moving from basic anatomy to practical application.1. Anatomy of an HTML ElementMany people use the terms "HTML tags" and "HTML elements" interchangeably, but they are technically different. An element is the complete bundle that includes the opening tag, any attributes, the content, and the closing tag.html<p class="intro-text">Hello, World!</p>Use code with caution.Breaking It DownOpening Tag (<p>): Tells the browser where the element begins and what type of content to expect (in this case, a paragraph).Attribute (class="intro-text"): Provides extra information or properties about the element. This is used by CSS for styling and JavaScript for functionality.Content (Hello, World!): The actual data (text, image, or other elements) displayed on the screen.Closing Tag (</p>): Tells the browser where the element ends. It includes a forward slash (/).Empty (Void) ElementsNot all HTML elements need a closing tag or content. These are called void elements. They only contain attributes and self-contain their functionality.<img>: Embeds an image.<br>: Forces a line break.<input>: Creates a data entry field.2. Structural & Metadata ElementsEvery valid HTML document requires a specific foundational structure. These elements do not always show up as visible content, but they give the browser instructions on how to read the page.The Document Wrapper<!DOCTYPE html>: This is a mandatory declaration at the start of the file. It tells the browser to parse the page using the latest HTML5 standard.<html>: The root element. Every single HTML element must live inside this container. It usually carries the lang attribute (e.g., <html lang="en">) to help screen readers identify the page language.The head vs. body SplitAn HTML document is split into two main functional zones:ElementMeaningFunction<head>Document MetadataContains hidden machine-readable information like character encoding, search engine keywords, stylesheets, and the page title.<body>Visible ContentContains everything the user actually sees and interacts with on the web page (text, images, links, videos).Crucial Head Elements<title>: Sets the name of the page shown on the browser tab and in search engine results.<meta>: Configures technical details. For example, <meta charset="UTF-8"> ensures international text characters display correctly, while <meta name="viewport" content="width=device-width, initial-scale=1.0"> makes the page mobile-responsive.3. Structural and Semantic Layout ElementsModern HTML relies heavily on semantic elements. A semantic element clearly describes its meaning to both the browser and the developer. Instead of making an entire webpage out of generic, meaningless <div> blocks, semantic elements create a clear digital outline.+-------------------------------------------------------+| <header> || +---------------------------------------------+ || | <nav> | || +---------------------------------------------+ |+-------------------------------------------------------+| <main> || +-----------------------+ +-------------------+ || | <article> | | <aside> | || | | | | || | +-----------------+ | | | || | | <section> | | | | || | +-----------------+ | | | || +-----------------------+ +-------------------+ |+-------------------------------------------------------+| <footer> |+-------------------------------------------------------+<header>Meaning: The introductory section or container of a page or component.Function: Houses logos, site names, search bars, or author information.<nav>Meaning: Short for navigation.Function: Wraps groups of primary links that allow users to click around the website.<main>Meaning: The dominant, central topic area of the page.Function: Encloses content unique to that specific page. It must not contain content repeated across pages, like sidebars or footers. There should only be one visible <main> element per document.<section>Meaning: A standalone thematic grouping of content.Function: Breaks up a long page into chapters or distinct areas (e.g., "Features", "Pricing", "Contact Us").<article>Meaning: An independent, self-contained piece of content.Function: Encapsulates content that could be copied, pasted, and reused on a completely different website while still making perfect sense (e.g., blog posts, product cards, forum entries).<aside>Meaning: Secondary or tangentially related content.Function: Displays sidebars, callout boxes, or advertising panels next to the primary text.<footer>Meaning: The closing section at the bottom of a page or layout block.Function: Houses copyright notices, privacy policy links, sitemaps, and social media handles.4. Text Content and Typography ElementsText elements structure written content so browsers can apply baseline styles and search engines can index headings appropriately.Headings (<h1> to <h6>)Meaning: Hierarchy indicators for titles and subtitles.Function: Organize information into a clear visual rank. <h1> represents the single most important topic on the page, down to <h6> for deep sub-sub-sections. Never skip heading levels (e.g., jumping from <h1> to <h3>), as it confuses screen readers.Text Formatting Group<p>: The paragraph element. Automatically creates vertical spacing above and below text blocks to optimize reading comfort.<strong>: Indicates that the wrapped text has urgent importance or seriousness. Browsers render this as bold text.<em>: Adds emphasis to a word, shifting the meaning of a sentence. Browsers render this as italics.<blockquote>: Represents a block of text quoted from another source. It naturally indents the content to visually separate it from the main narrative.ListsLists organize data points cleanly:<ul>: Unordered list. Creates a bulleted list format.<ol>: Ordered list. Creates a numbered list format ().<li>: List item. The specific child container holding the actual text inside a <ul> or <ol>.5. Inline Text Semantics and HyperlinksInline elements sit inside block-level elements without forcing a new line on the page.The Hyperlink Element (<a>)The anchor tag (<a>) connects the internet together. It creates a clickable link to another location.html<a href="https://example.com" target="_blank" rel="noopener">Visit Example</a>Use code with caution.href Attribute: Specifies the destination URL.target="_blank" Attribute: Tells the browser to open the link in a completely new tab.rel="noopener" Attribute: A security necessity when opening new tabs. It prevents the newly opened page from hijacking your original page using malicious JavaScript code.Utility Inline Selectors<span>: A generic inline container with no inherent meaning. It is used to target a specific word or phrase for styling via CSS or manipulation with JavaScript.<code>: Formats text using a monospaced font family to display computer programming code strings smoothly.6. Multimedia and Embedded ContentHTML5 introduced native tags to handle rich media natively without requiring outdated, insecure plugins.<img> (Images)html<img src="assets/banner.jpg" alt="A laptop on a clean wooden desk" loading="lazy">Use code with caution.src: Points to the path where the image file is saved.alt: Alternate text. This is a critical accessibility feature. If the image fails to load, or if a visually impaired user relies on a screen reader, this text explains what the image shows.loading="lazy": An optimization property that delays loading the image until the user scrolls near it, improving initial site load speeds.<video> and <audio> (Rich Media)These elements imbed video clips or sound files directly onto a page. By including the controls attribute, the browser automatically builds play, pause, and volume buttons for the end user.html<video src="clip.mp4" controls width="640"> Your browser does not support video playback.</video>Use code with caution.7. Forms and User InputsForms allow web applications to collect information from users, handling tasks like logins, search bars, and checkouts.<form>: The outer container that captures and coordinates the collected inputs, defining where to send the data when submitted.<label>: Links text descriptions to input fields. Clicking a label focuses the user's cursor into the matching input box, which dramatically improves accessibility.<input>: The primary engine for user entry. The data structure changes completely depending on its type attribute:type="text": Standard short text entry box.type="email": Validates that the input contains an @ sign.type="password": Obscures input characters automatically.type="checkbox": Allows selecting multiple options.<textarea>: An expandable multi-line text input field used for comments, messages, or reviews.<button>: A clickable element used to trigger actions or submit data to a server.8. Best Practices for Modern HTMLTo maximize the impact of your markup, follow these industry-standard rules:Always Prioritize Semantics: Do not use a <div> if a <button>, <p>, or <main> exists for your use case. Semantics dramatically improve Search Engine Optimization (SEO) and help screen readers navigate your content.Maintain Attribute Cleanliness: Keep attributes organized uniformly. Always place critical structural attributes like id, class, src, or href first to optimize human readability.Validate Your Closing Tags: Forgetting to close tags can trigger rendering errors, breaking your layout downstream. Use modern code editors with built-in auto-close extensions to prevent syntax bugs.ConclusionHTML elements are much more than simple layout brackets. They define the structural logic, structural meaning, and functional interactions of everything we experience online. By matching the right semantic element to its correct use case, you build web experiences that are structurally stable, accessible to all users, and highly optimized for modern search engines.
Javascript Object Arrays: Core Concepts and Manipulation
May 27, 2026
8 min read

Javascript Object Arrays: Core Concepts and Manipulation

Mastering Javascript Object Arrays: Core Concepts, Manipulation, and Real-World Applications. Arrays of objects are the foundational data structure of modern web development. Whether you are fetching data from a REST API, managing state in a React application, or building a backend service with Node.js, you will constantly interact with this structure.This comprehensive guide explores how to construct, manipulate, and apply object arrays in JavaScript, moving from core fundamentals to advanced data processing.1. Understanding Object ArraysAn object array is a standard JavaScript array where every element is a JavaScript object. This structure combines the ordered, indexed nature of arrays with the descriptive, key-value pairing of objects.The Basic SyntaxHere is a baseline example representing a list of products in an e-commerce inventory:javascriptconst inventory = [ { id: 101, name: "Wireless Mouse", category: "Electronics", price: 29.99, inStock: true }, { id: 102, name: "Office Chair", category: "Furniture", price: 149.50, inStock: false }, { id: 103, name: "Mechanical Keyboard", category: "Electronics", price: 89.99, inStock: true }, { id: 104, name: "Desk Lamp", category: "Furniture", price: 25.00, inStock: true }];Use code with caution.Accessing DataTo access properties within an object array, combine array indexing ([index]) with object dot notation (.property):javascript// Access the name of the first itemconsole.log(inventory[0].name); // Output: Wireless Mouse// Access the price of the third itemconsole.log(inventory[2].price); // Output: 89.99Use code with caution.2. Essential CRUD OperationsManaging collections of data requires performing CRUD (Create, Read, Update, Delete) operations efficiently.Create: Adding New Objectspush(): Adds an object to the end of the array.Spread Operator (...): Creates a new array with the added object, which is ideal for immutable state management.javascriptconst newProduct = { id: 105, name: "Water Bottle", category: "Accessories", price: 15.00, inStock: true };// Mutable approachinventory.push(newProduct);// Immutable approach (Preferred in React)const updatedInventory = [...inventory, newProduct];Use code with caution.Read: Iterating and ViewingThe modern standard for reading or looping through an object array is the forEach() method or the for...of loop.javascriptinventory.forEach(item => { console.log(`${item.name} costs $${item.price}`);});Use code with caution.Update: Modifying Existing ObjectsTo update specific objects, find the item by a unique identifier (like an id) and modify its properties.javascript// Find item 102 and change inStock to trueconst itemToUpdate = inventory.find(item => item.id === 102);if (itemToUpdate) { itemToUpdate.inStock = true;}Use code with caution.Delete: Removing ObjectsThe filter() method is the cleanest way to remove items. It creates a new array excluding the target item.javascript// Remove the item with ID 104const filteredInventory = inventory.filter(item => item.id !== 104);Use code with caution.3. High-Order Array Methods for Data ManipulationJavaScript provides powerful functional methods specifically designed to process arrays without manual, deeply nested loops.Filtering Collections with filter()filter() evaluates each object against a condition and returns a new array containing only the elements that match.javascript// Get only electronics that are in stockconst availableElectronics = inventory.filter(item => item.category === "Electronics" && item.inStock);Use code with caution.Transforming Structures with map()map() iterates through the array and returns a completely new array transformed according to your specifications. It is highly useful for extracting single columns of data or altering object keys.javascript// Create an array of strings detailing price tagsconst priceTags = inventory.map(item => `${item.name} - $${item.price}`);// Output: ["Wireless Mouse - $29.99", ...]// Apply a 10% discount to all itemsconst discountedInventory = inventory.map(item => ({ ...item, price: parseFloat((item.price * 0.9).toFixed(2))}));Use code with caution.Aggregating Data with reduce()reduce() boils down an entire array into a single value, such as a sum, a string, or an entirely different object structure.javascript// Calculate total value of all stockconst totalValue = inventory.reduce((accumulator, item) => { return accumulator + item.price;}, 0); console.log(totalValue); // Output: 294.48Use code with caution.Searching Elements: find() vs. findIndex()find() returns the first actual object that matches a criteria.findIndex() returns the numerical index of that object.javascript// Get the cheap item objectconst cheapItem = inventory.find(item => item.price < 30);// Get the position of the desk lampconst lampIndex = inventory.findIndex(item => item.name === "Desk Lamp");Use code with caution.4. Advanced Manipulation TechniquesReal-world datasets require sorting, grouping, and nesting logic to be useful to end users.Sorting Objects Multi-CriteriaSorting strings and numbers inside objects requires passing a custom comparator function to sort(). Be aware that sort() mutates the original array, so copy it first using the spread operator.javascript// Sort inventory by price (lowest to highest)const sortedByPrice = [...inventory].sort((a, b) => a.price - b.price);// Sort alphabetically by product nameconst sortedByName = [...inventory].sort((a, b) => a.name.localeCompare(b.name));Use code with caution.Grouping Flat ObjectsOften, data needs to be grouped by a category key. We can use reduce() to dynamically build a grouped object.javascriptconst groupedByCategory = inventory.reduce((groups, item) => { const category = item.category; if (!groups[category]) { groups[category] = []; } groups[category].push(item); return groups;}, {});/* Output Structure:{ Electronics: [ {id: 101...}, {id: 103...} ], Furniture: [ {id: 102...}, {id: 104...} ]}*/Use code with caution.5. Real-World ApplicationsTo understand why object arrays are critical, let's look at three practical applications used across front-end and back-end web development.Application 1: E-Commerce Cart LogicAn online shopping cart requires dynamic calculations for totals, item quantities, and tax valuations.javascriptconst shoppingCart = [ { productId: 1, name: "Laptop", price: 999.99, quantity: 1 }, { productId: 2, name: "Mouse Pad", price: 15.50, quantity: 2 }, { productId: 3, name: "HDMI Cable", price: 8.00, quantity: 3 }];class CartManager { static calculateSubtotal(cart) { return cart.reduce((total, item) => total + (item.price * item.quantity), 0); } static addItem(cart, newItem) { const existingItem = cart.find(item => item.productId === newItem.productId); if (existingItem) { existingItem.quantity += newItem.quantity; return cart; } return [...cart, newItem]; }}console.log (` Subtotal: $${ CartManager.calculateSubtotal (shoppingCart)}`);Use code with caution.Application 2: UI Rendering (Dashboard & Tables)Frameworks like React, Vue, and vanilla JavaScript manipulate object arrays to dynamically build HTML elements on dashboards.javascript// Vanilla JS: Rendering a user directory array into an HTML Tableconst users = [ { name: "Alice", role: "Admin", email: "alice@company.com" }, { name: "Bob", role: "Editor", email: "bob@company.com" }];function renderTable(userArray) { const tableBody = document.querySelector ("#user-table-body"); // Clear existing content to prevent duplication tableBody.innerHTML = ""; const rows = userArray.map(user => ` <tr> <td>${user.name}</td> <td><strong>${user.role}</strong></td> <td>${user.email}</td> </tr> `).join(""); // Converts array of strings into one single HTML string tableBody.innerHTML = rows;}Use code with caution.Application 3: REST API Data NormalizationWhen consuming raw data from external APIs, the data payload often contains unnecessary bloat. You can use object arrays to sanitize and format the incoming data stream before saving it to a database or serving it to a client UI.javascript// Raw bloated data from a third-party server APIconst rawApiPayload = [ { user_id: "usr_99", first_name: "John", last_name: "Doe", internal_sys_code: "XYZ123", active_flag: 1 }, { user_id: "usr_100", first_name: "Jane", last_name: "Smith", internal_sys_code: "ABC789", active_flag: 0 }];// Cleaned data mapped for internal app usageconst sanitizedUsers = rawApiPayload.map(rawUser => ({ id: rawUser.user_id, fullName: `${rawUser.first_name} ${rawUser.last_name}`, isActive: Boolean(rawUser.active_flag)}));console.log(sanitizedUsers);// Output: [ { id: 'usr_99', fullName: 'John Doe', isActive: true }, ... ]Use code with caution.6. Performance Best PracticesWhen handling arrays containing thousands or millions of objects, minor optimization issues can cause memory leaks or UI freezes. Keep these performance strategies in mind:Avoid Excessive Chaining: Chaining .filter().map().filter() causes JavaScript to loop over your arrays entirely multiple times. If your dataset is large, combine these steps into a single .reduce() or a traditional for loop to scan the array only once.Beware of Deep Mutability: Methods like sort(), reverse(), and splice() change your original array. Always create a shallow copy first ([...array].sort()) to prevent unintended side effects across your app state.Utilize Indexes for Lookups: If you have to find an item repeatedly within an array of 50,000 objects, running .find() every time will kill performance. Instead, convert your object array into a single Lookup Object (Map) where the keys are the unique IDs:javascriptconst inventoryMap = new Map(inventory.map(item => [item.id, item]));// Fast O(1) instant lookup timeconst mouse = inventoryMap.get(101); Use code with caution.ConclusionMastering object arrays is a core milestone in your journey as a JavaScript developer. By combining declarative utility methods like map(), filter(), and reduce(), you can transform and manipulate complex datasets using minimal, clean code. Experiment with these patterns in your next data-driven application to build scalable architectures.
A Comprehensive Guide to Mastering Inferential Statistics
May 26, 2026
9 min read

A Comprehensive Guide to Mastering Inferential Statistics

Mastering Inferential Statistics: A Comprehensive Guide to Sampling Methods and Estimation. Data is everywhere, but it is rarely practical to collect every piece of it. A multinational corporation cannot interview all eight billion people on Earth to test a new product. A medical research team cannot test a life-saving drug on every patient suffering from a specific disease.This logistical barrier is where inferential statistics becomes essential.Inferential statistics allows researchers to take a small, manageable portion of data and use it to make accurate predictions about a much larger group. This comprehensive guide explores the core framework of inferential statistics, focusing on two of its most critical pillars: sampling methods and estimation.1. The Core Framework: Population vs. SampleTo understand how inferential statistics works, you must first master the distinction between a population and a sample.Population: The entire group of individuals, objects, or measurements that you want to study. For example, all registered voters in a country, or every smartphone manufactured by a factory in a year.Sample: A smaller, representative subset selected from the larger population. For example, 1,500 voters selected for a polling survey.+------------------------------------------+| POPULATION || (Parameters: Mean μ, SD σ) || || +----------------------------+ || | SAMPLE | || | (Statistics: Mean x̄, s) | || +----------------------------+ |+------------------------------------------+Parameters vs. StatisticsData points change names depending on where they come from:Parameters: Numerical characteristics of a population (e.g., the true population mean, denoted by the Greek letter, or the population standard deviation, denoted by). These are usually unknown because measuring the entire population is impossible.Statistics: Numerical characteristics of a sample (e.g., the sample mean, denoted as, or the sample standard deviation, denoted as). These are calculated directly from your collected data.The core objective of inferential statistics is to use known sample statistics to estimate unknown population parameters.2. Sampling Methods: Building the FoundationThe validity of any statistical inference depends entirely on the quality of the sample. If a sample does not accurately reflect the diversity of the population, the resulting conclusions will be flawed. This flaw is known as sampling bias.Sampling methods are broadly divided into two categories: probability sampling and non-probability sampling.Probability Sampling MethodsIn probability sampling, every member of the population has a known, non-zero chance of being selected. This category is the gold standard for inferential statistics because it minimizes bias and allows for mathematical calculations of error.1. Simple Random Sampling (SRS)Every individual in the population has an equal chance of selection.How it works: Assign a number to every individual and use a random number generator to pick the sample.Example: Putting 100 employee names into a digital hat and drawing 10.Pros & Cons: Highly objective and easy to explain, but can be logistical nightmares for massive populations.2. Systematic SamplingMembers are selected at regular, predetermined intervals.How it works: Choose a random starting point, then select every-th individual from a ordered list (where).Example: Selecting every 20th car that rolls off an assembly line.Pros & Cons: Simpler and faster than SRS. However, if the population list has a hidden repeating pattern (periodicity), the sample will be highly biased.3. Stratified SamplingThe population is split into distinct, non-overlapping subgroups based on shared traits, called strata.How it works: Group the population by traits like age, gender, or income. Then, draw a random sample from each subgroup proportional to its size in the real population.Example: If a university is 60% undergraduate and 40% postgraduate, a stratified sample of 100 students will randomly pick exactly 60 undergraduates and 40 postgraduates.Pros & Cons: Ensures minority groups are fairly represented, increasing overall accuracy. The downside is that identifying and sorting individuals into clear strata requires deep prior knowledge of the population.4. Cluster SamplingThe population is divided into naturally occurring groups, called clusters, typically based on geography or organization.How it works: Instead of selecting individual people, you randomly select entire clusters and survey everyone inside those chosen clusters.Example: To study high school students in a state, randomly select 10 school districts (clusters) and interview every student in those 10 districts.Pros & Cons: Highly cost-effective and practical for large geographical areas. However, people within the same cluster often share similar views or traits, which can make the sample less representative than an SRS of the same size.Non-Probability Sampling MethodsIn non-probability sampling, elements are chosen based on convenience, judgment, or specific criteria, meaning not everyone has a chance to be selected. While easier and cheaper, these methods cannot be used to make rigorous statistical inferences because they introduce heavy bias.Convenience Sampling: Choosing individuals who are easiest to reach (e.g., interviewing people walking past you at a mall).Purposive (Judgmental) Sampling: The researcher uses their personal expertise to handpick a sample they believe fits the study's specific goals.Snowboard / Chain Sampling: Existing research participants recruit future participants from among their acquaintances (useful for hard-to-reach populations like underground subcultures).Quota Sampling: Setting a specific target number of people who meet certain criteria (e.g., "find 50 men and 50 women"), but filling those spots using convenience methods rather than random selection.3. The Central Limit Theorem (CLT): The Mathematical BridgeBefore moving from sampling to estimation, we must look at the mathematical engine driving inferential statistics: the Central Limit Theorem (CLT).Imagine taking a random sample of 30 people from a city, calculating their average height, and plotting it on a graph. Now imagine doing this 10,000 times. You would create a distribution of thousands of different sample means. This distribution is called the sampling distribution of the mean.The Central Limit Theorem states that:Normal Shape: If your sample size () is sufficiently large (usually), the sampling distribution of the mean will look like a bell-shaped curve (normal distribution). This remains true even if the underlying population distribution is completely skewed or irregular.Center: The average of all your sample means will exactly equal the true population mean ().Spread (Standard Error): The spread of these sample means is called the Standard Error (). It measures how much sample means fluctuate from sample to sample. It is calculated as:(Whereis the population standard deviation andis the sample size).The Central Limit Theorem is incredibly powerful. It proves that as your sample size grows larger, your sample mean becomes a highly reliable tracker of the true population mean.4. Estimation: Finding the True ValueOnce you have gathered a clean, random sample, you can use estimation to predict the true, hidden population parameters. Estimation is split into two strategies: Point Estimation and Interval Estimation.Point EstimationA point estimate uses a single calculated number from your sample to serve as the best guess for the population parameter.The sample mean () is the point estimate for the population mean ().The sample proportion () is the point estimate for the population proportion ().The Flaw of Point Estimates: While simple, point estimates are almost never 100% accurate. If your sample mean for employee satisfaction is 7.4 out of 10, it is highly unlikely the true population average is exactly 7.40000. It might be 7.3 or 7.5. A point estimate gives you a target, but it fails to communicate the margin of error or how confident you are in that number.Interval Estimation (Confidence Intervals)To fix the limitations of a point estimate, statisticians prefer Interval Estimation. This approach builds a range of plausible values around your point estimate, known as a Confidence Interval (CI).A confidence interval is structured as:Understanding the Confidence LevelA confidence interval is always tied to a confidence level (usually 95% or 99%).If you calculate a 95% Confidence Interval, it does not mean there is a 95% probability that the true population parameter sits inside that specific range. Instead, it means: "If we repeat this study with new random samples 100 times, 95 of the resulting intervals we calculate will successfully capture the true population parameter."Calculating a Confidence Interval for a Population Mean ()The exact formula depends on whether you know the true population standard deviation ().Scenario A: Whenis known (Using the Z-Distribution)(Whereis the critical value from the standard normal distribution based on your confidence level).For a 95% confidence level, the-value is 1.96.For a 99% confidence level, the-value is 2.58.Scenario B: Whenis unknown (Using the t-Distribution)In the real world, you almost never know the population standard deviation (). When it is missing, you must swap it out for your sample standard deviation () and use the Student's t-distribution instead of the standard Z-distribution.(Whererepresents degrees of freedom, calculated as).The-distribution looks similar to a normal distribution but has thicker tails. This shape accounts for the extra uncertainty that comes from estimating both the mean and the standard deviation at the same time. As your sample size () grows larger, the-distribution flattens out until it matches the standard-distribution.Visual Comparison of Distributions:Normal (Z) : _..---.._ (Thinner tails, higher peak)t-dist (df=5): .' _..._ '. (Thicker tails, handles uncertainty)5. Practical Example: Estimating Customer SpendingLet’s apply these theoretical steps to a practical business scenario.The ProblemAn e-commerce retailer wants to find the average amount of money spent per transaction on their website over the last year. They have millions of transactions, making it too slow and expensive to pull and clean the entire database. They decide to use inferential statistics.Step 1: SamplingThe retailer extracts an automated Simple Random Sample oftransactions from the past year. Because the sample size is greater than 30 (), the Central Limit Theorem applies, allowing them to proceed with confidence.Step 2: Calculate Sample StatisticsAfter running the numbers on the 100 sampled transactions, they find:Sample mean spending (): $85.00Sample standard deviation (): $20.00Step 3: Choose the Interval ModelBecause the true population standard deviation () is unknown, they must use the-distribution with degrees of freedom:Looking at a standard-table for a 95% confidence level with 99 degrees of freedom, the critical value is roughly:Step 4: Compute the Margin of Error (MoE)The margin of error is approximately $3.97.Step 5: Build and Interpret the IntervalConclusion: The retailer can state with 95% confidence that the true average spend across all millions of transactions falls somewhere between $81.03 and $88.97.Summary of Key Formulas and ConceptsConceptKey Formula / DefinitionPractical PurposeSimple Random SampleEqual chance selectionEliminates systemic biasCentral Limit TheoremProves large samples yield normal distributionsPoint EstimateorProvides a single, direct guess for a parameterConfidence Interval (Z)Used for interval estimation whenis knownConfidence Interval (t)Used for interval estimation whenis unknownConclusionInferential statistics changes data analysis from a passive backward glance into a forward-looking predictive tool. By understanding how to select an unbiased, random probability sample, you build a dependable foundation. By layering the Central Limit Theorem and interval estimation over that sample, you can extract deep insights about massive, complex populations using minimal data.Whether you are optimizing factory operations, tracking public opinion trends, or launching a new business project, mastering these foundational techniques protects you from relying on guesswork, letting you base your decisions on mathematically sound conclusions
A Beginner’s Guide to Website Structure and Components
May 26, 2026
7 min read

A Beginner’s Guide to Website Structure and Components

Blueprint of the Web: A Beginner’s Guide to Website Structure and Components. Every single day, billions of people click links, scroll through feeds, and complete checkouts on websites without ever thinking about how those digital spaces are built. To a beginner, a website can look like magic. However, beneath the beautiful designs, smooth animations, and product grids lies a highly logical structure built from standardized, reusable components.Building a website is very much like building a house. You cannot start by choosing the paint colors or picking out furniture; you must first lay a solid foundation, build the structural framework, map out the plumbing, and design the floor plan. In the digital world, this layout is known as website architecture.Whether you are looking to learn web development, starting an e-commerce side-hustle, or simply trying to understand how your business’s digital assets work, this guide breaks down website structures and essential components in plain language.🧭 The Core Mechanics: Frontend vs. BackendBefore diving into the visual building blocks of a webpage, it is critical to understand the two main layers that make a website function: the Frontend and the Backend.[ Frontend: The Visual Interface ] ── (Requests Data) ──► [ Backend: The Engine Room ] ◄── (Sends Data) ──The Frontend (The Client-Side)The frontend is everything a user sees, clicks, and interacts with directly inside their web browser. If you can view it, click it, or hover over it, it is part of the frontend. It is constructed using three primary languages:HTML (HyperText Markup Language): The raw bones and skeleton of the website. It defines where headings, paragraphs, images, and buttons go.CSS (Cascading Style Sheets): The clothing and makeup. It dictates the colors, fonts, spacing, alignment, and overall design style.JavaScript: The muscle and nervous system. It makes the site interactive, handling things like pop-up windows, drop-down menus, and data calculations.The Backend (The Server-Side)The backend is the invisible engine room behind the scenes. It consists of a web server, an application instance, and a database. When you log into an account, buy a product, or type a search query, the backend processes your request, searches the database, and sends the correct data back to your screen.🗺️ Website Architecture: Organizing the Whole SiteWebsite structure refers to how the different pages of your website are linked together and organized. A well-planned architecture helps human users find information in less than three clicks and enables search engine bots (like Google) to crawl and index your content efficiently.There are several ways to structure a site, but the most widely adopted framework is the Hierarchical Tree Structure. [ Home Page ] │ ┌───┴───┐ ▼ ▼ [ Services Page ] [ About Us Page ] │ ┌──┴──┐ ▼ ▼[Web Dev] [SEO Optimization]1. The Home Page (The Roots)The home page acts as your website's virtual front door and the main entry point for your traffic. It sets the tone, introduces the core value proposition, and points visitors toward the site's deeper sections.2. Category Pages (The Branches)These pages group related content together. For an online clothing store, categories would be "Men's Clothing," "Women's Clothing," and "Accessories." For a corporate business site, categories might include "Services," "Case Studies," and "Contact Us."3. Sub-Category/Individual Pages (The Leaves)These are the deepest pages on your website. They hold specific information, such as an individual blog article, a single product checkout page, or a breakdown of a specific service feature.🛠️ The Global Components: Anatomy of a WebpageEvery single page on a website contains standard structural regions. Regardless of whether you visit a news outlet, a personal blog, or a banking dashboard, you will almost always find these global components.┌─────┐│ [HEADER] Logo Home About Services Contact │├─────┤│ ││ [HERO SECTION] ││ Big Bold Heading (H1) ││ Subheading explanatory text ││ [Call-to-Action Button] ││ │├───┤│ [MAIN CONTENT AREA] ││ Articles, product grids, images, videos, testimonials ││ │├────┤│ [FOOTER] Privacy Policy | Terms of Service | © 2026 │└───┘1. The Header (Navigation Bar)Located at the absolute top of the page, the header is a permanent anchor across your entire website. Its main job is to help users find their way around.The Logo: Usually placed in the top-left corner. Clicking it will always return the user to the home page.Navigation Links: Buttons or text paths leading directly to primary category pages.Search Bar: A helpful field for larger websites, allowing users to bypass menus and search for specific content immediately.Shopping Cart / Profile Icon: Common on interactive e-commerce and member websites.2. The Hero SectionThe Hero Section is the first major visual area a visitor sees right below the header. It needs to capture attention instantly before the user scrolls down.The H1 Heading: The most important title on the page, summarizing exactly what the business or website does.Supporting Copy: A short 2–3 sentence paragraph expanding on the title.Call-to-Action (CTA) Button: A bright, highly visible button designed to drive user action (e.g., "Get Started," "Shop Now," "Book a Free Call").Background Visual: A high-resolution image, video loop, or clean abstract illustration matching the brand tone.3. The Main Content BodyThis is the heart of the page, holding the unique content that the user came to read. The body is typically broken down into distinct sections separated by vertical whitespace:Feature Grid blocks: Highlighting key benefits or capabilities.Media Containers: Embedded images, audio players, or video elements.Testimonials / Social Proof: Reviews, customer quotes, and case studies proving credibility.Contact Forms: Simple boxes allowing visitors to send messages directly without opening an email app.4. The FooterThe footer sits at the very bottom of the page. It serves as a safety net for lost users and holds important administrative, regulatory, and legal links.Legal Links: Copyright notices, Privacy Policies, and Terms of Service documents.Contact & Location Details: Physical addresses, customer service phone numbers, and support email channels.Social Media Icons: Direct hyperlinked connections to the company's profiles on external platforms like LinkedIn or Instagram.Sitemap Links: A comprehensive, text-based list of links to all major areas of the website.📈 Key Best Practices for Website DesignWhen assembling these pieces for the first time, keep these fundamental digital design principles in mind:Mobile-First Responsiveness: Over 55% of all web traffic comes from smartphones. Your website structure must adjust dynamically to look fantastic on desktop monitors, tablets, and small phone screens alike.Visual Hierarchy: Use size, weight, and color contrast to guide the user's eye. Your H1 heading should always be much larger than body paragraphs, and your primary CTA buttons should pop out noticeably against your background colors.Clear White Space: Avoid cluttering elements together. Generous spacing around text and sections gives your design room to breathe and makes it much easier to read.Fast Load Speed: Websites with heavy, unoptimized images load slowly, driving visitors away. Keep files compressed and use modern image formats like WebP.📊 Summary Structure Checklist for Absolute BeginnersComponent LayerCore ResponsibilityTypical Elements IncludedHeaderNavigation and OrientationCompany logo, menu navigation links, user search utilityHero SectionFirst Impression & Primary GoalH1 title statement, brief value copy, Call-to-Action buttonMain ContentDelivery of InformationParagraphs, informative images, videos, lists, contact formsFooterLegal and Secondary LinksCopyright info, privacy policy links, social media channels🏁 ConclusionBuilding a website becomes much less intimidating once you realize it is just a puzzle made of standardized components. By understanding how the header, hero section, content body, and footer work together across a clear page hierarchy, you can design user-friendly digital spaces from scratch. Master these baseline building blocks first, and you will have a solid foundation for your journey into web development, design, or digital marketing.
 Guides to JavaScript Objects with Real-World Applications
May 26, 2026
7 min read

Guides to JavaScript Objects with Real-World Applications

Master the Blueprint: A Practical Guide to JavaScript Objects with Real-World Applications. In JavaScript, almost everything revolves around a single fundamental concept: Objects. Whether you are extracting structured data from a remote REST API, managing the global application state in a frontend framework like React, or manipulating elements within the Document Object Model (DOM), you are constantly interacting with objects.Unlike primitive data types such as strings or numbers—which store single isolated values—objects act as structured collections. They allow developers to bundle related data variables (properties) and functional logic (methods) into a single, cohesive entity. Understanding objects is the definitive boundary line separating a casual scriptwriter from a proficient software engineer.This comprehensive technical guide breaks down the core structural mechanics of JavaScript objects, explains essential data manipulation patterns, and walks through production-ready code examples mapping directly to real-world applications.🧭 The Core Anatomy of a JavaScript ObjectAt its absolute simplest level, an object is an unordered collection of key-value pairs. The key (or property name) acts as a unique string identifier, pointing directly to a corresponding value, which can be any data type in the JavaScript ecosystem—including arrays, other objects, or executable functions.┌────────┐│ User Object │├───────┤│ • Key: username ──► Value: "dev_alex" │ ◄── Property (Data)│ • Key: isActive ──► Value: true │ ◄── Property (Data)│ ││ • Key: login() ──► Value: function() │ ◄── Method (Behavior)└───────┘When a variable is attached to an object, it is called a property. When an executable function is attached to an object, it is called a method.🛠️ Fundamental Mechanics: Creation and Data ManipulationBefore exploring complex enterprise applications, let’s look at how to declare objects and interact with their internal values.1. Object Declaration (The Literal Syntax)The most common and modern way to initialize an object is by using curly braces {}. This is known as the object literal syntax:javascript// Initializing a baseline user profile objectconst userProfile = { username: "cyber_sentinel", accountLevel: "Administrator", loginCount: 42, isTwoFactorEnabled: true};Use code with caution.2. Accessing Property ValuesJavaScript provides two intuitive ways to read properties stored inside an object: Dot Notation and Bracket Notation.javascript// 1. Dot Notation (Preferred for clean, standard property names)console.log(userProfile.username); // Output: cyber_sentinel// 2. Bracket Notation (Mandatory when property names use spaces, special characters, or variables)console.log (userProfile[ "accountLevel"]); // Output: Administrator// Dynamic access example using bracket notation:const queryKey = "loginCount";console.log (userProfile[queryKey]); // Output: 42Use code with caution.3. Modifying and Appending New DataObjects in JavaScript are dynamic and mutable by default. You can easily add completely new fields or alter existing values on the fly:javascript// Updating an existing property valueuserProfile.loginCount = 43;// Appending an entirely new property to the existing structureuserProfile.lastLoginIp = "192.168.1.105";// Deleting a property permanently from the objectdelete userProfile. isTwoFactorEnabled;console.log(userProfile);/*Output:{ username: "cyber_sentinel", accountLevel: "Administrator", loginCount: 43, lastLoginIp: "192.168.1.105"}*/Use code with caution.🏗️ Advanced Object Patterns: Methods and the this KeywordObjects become truly powerful when they hold functions. Methods allow objects to manage their own internal state and perform actions independently.javascriptconst e-commerceCart = { items: ["Laptop", "Wireless Mouse"], discountCode: "SUMMER20", totalAmount: 1250, // Method executing internal object data manipulation calculateFinalPrice: function() { // The 'this' keyword explicitly references the execution context of the parent object if (this.discountCode === "SUMMER20") { return this.totalAmount * 0.8; // Apply a 20% discount } return this.totalAmount; }};console.log (e-commerceCart. calculateFinalPrice() ); // Output: 1000Use code with caution.⚠️ Critical Architectural Warning: Avoid using arrow functions () => {} when writing methods inside objects. Arrow functions do not bind their own this context. Instead, they lexically inherit this from the surrounding global scope, which can cause unexpected undefined runtime errors.💼 Real-World Application 1: Managing an E-Commerce Shopping Cart SystemLet’s apply these fundamentals to a real-world scenario. Below is a production-style implementation of a shopping cart object capable of managing complex state calculations, adding new items safely, and generating checkout line receipts.javascriptconst shoppingCartManager = { customerName: "Elena Rostova", cartId: "CART_99821", itemsList: [], taxRate: 0.08, // 8% State Tax // Method to safely append a product line item to the internal array state addItem: function (productName, unitPrice, quantity = 1) { this.itemsList.push ({ name: productName, price: unitPrice, qty: quantity }); console.log (`Success: Added ${quantity} x ${productName} to the cart.`); }, // Method utilizing iteration loops to compute subtotal pricing metrics calculateSubtotal: function() { let subtotal = 0; for (let i = 0; i < this .itemsList. length; i++) { subtotal += this. itemsList[i].price * this.itemsList[i].qty; } return subtotal; }, // Method utilizing subtotal metrics to compute exact tax and final pricing generateInvoice: function() { const rawSubtotal = this .calculateSubtotal(); const computedTax = rawSubtotal * this.taxRate; const grandTotal = rawSubtotal + computedTax; return { client: this.customerName, subtotalPrice: rawSubtotal.toFixed(2), taxCharged: computedTax. toFixed(2), finalCheckoutPrice: grandTotal.toFixed(2) }; }};// --- Practical Execution Sequence ---shoppingCartManager. addItem ("Pro Mechanical Keyboard", 149.99, 1); shoppingCartManager. addItem ("4K UltraWide Monitor", 499.00, 2);// Generate final structured invoice payloadconst finalInvoice = shoppingCartManager. generateInvoice();console.table(finalInvoice);Use code with caution.Output Visualization Table:PropertyValueclientElena RostovasubtotalPrice1147.99taxCharged91.84finalCheckoutPrice1239.83💼 Real-World Application 2: Parsing Server API JSON PayloadsWhen working with modern web applications, you rarely create all your own data. Instead, your frontend apps fetch text-based JSON payloads from external server databases. JavaScript objects make it incredibly simple to parse and extract this information.Imagine your frontend application receives the following raw JSON data string from a backend user database:javascriptconst rawJsonPayloadFromServer = `{"id":1024, "meta": {"role":"editor", "department": "marketing"}, "profile" : {"fullName": "Marcus Vance", "emails": ["marcus@company.com", "marcus. personal@gmail.com"]}}`;// Step 1: Parse the string payload into a native JavaScript Object structureconst cleanUserData = JSON.parse(rawJsonPayloadFromServer);// Step 2: Extract nested items safely using Dot and Bracket Notation patternsconst userRole = cleanUserData. meta.role;const primaryEmailAddress = cleanUserData. profile. emails[0];console.log(`User: ${cleanUserData. profile.fullName} holds the role of: ${userRole}.`);// Output: User: Marcus Vance holds the role of: editor.Use code with caution.📈 Functional Utilities: Iterating and Cloning ObjectsAs software scales, you often need to loop through object keys or make safe copies of data packages. Here are the three most reliable ways to extract object metrics dynamically:javascriptconst serverStatus = { nodeId: "NODE_S1", cpuLoad: "42%", uptimeHours: 720};// 1. Object.keys() - Returns an array of all keysconsole.log (Object.keys (serverStatus)); // Output: ['nodeId', 'cpuLoad', 'uptimeHours']// 2. Object.values() - Returns an array of all valuesconsole.log (Object.values (serverStatus)); // Output: ['NODE_S1', '42%', 720]// 3. Object.entries() - Returns an array of nested key-value pairsconsole.log (Object.entries (serverStatus));// Output: [ ['nodeId', 'NODE_S1'], ['cpuLoad', '42%'], ['uptimeHours', 720] ]Use code with caution.Safe Data Cloning (Avoiding Reference Bugs)In JavaScript, copying an object with a simple equals sign (const copy = original) does not create a new object. Instead, it copies the reference pointer in memory. If you change a value in the copy, the original object changes too! To avoid this common bug, make a true copy using the Spread Operator (...):javascriptconst originalConfig = { theme: "dark", notifications: true };// Creating a safe clone copy that points to an entirely isolated memory spaceconst safeCloneConfig = { ...originalConfig };// Updating the clone does not damage the original setupsafeCloneConfig.theme = "light";console.log(originalConfig.theme); // Output: "dark" (Preserved!)console.log(safeCloneConfig.theme); // Output: "light" (Modified!)Use code with caution.📊 Quick Reference Checklist: Essential Object OperationsIntentCode ExampleOutput / ImpactInstantiationconst app = {};Creates an empty object literal container.Read Valueapp.theme;Accesses data using direct dot notation.Write/Updateapp.version = "2.1";Dynamically appends or overrides data.Check for Key"version" in app;Returns true or false based on field existence.Shallow Cloneconst copy = {...app};Copies all fields into a safe, independent object.🏁 ConclusionJavaScript objects are far more than just containers for plain text data. They are the scaffolding upon which complex modern web applications are built. By mastering how to structure properties, design self-contained methods, leverage context pointers via the this keyword, and parse external server JSON responses, you can write much cleaner, more modular code.Whether your next project involves building complex data structures, handling global state management, or developing server-side APIs, leveraging robust object-oriented patterns will ensure your applications remain maintainable and highly scalable.
A Step-by-Step Technical Guide to Configuring an IPS on Kali Linux
May 26, 2026
10 min read

A Step-by-Step Technical Guide to Configuring an IPS on Kali Linux

Network Fortress: A Step-by-Step Technical Guide to Configuring an Intrusion Prevention System (IPS) on Kali Linux. In the offensive security ecosystem, Kali Linux is universally recognized as the premier toolkit for penetration testing, vulnerability assessment, and adversarial simulation. However, a deep understanding of cybersecurity requires mastering both sides of the coin. Configuring defensive security controls directly within an offensive operating system provides invaluable insights into how automated platforms detect, block, and log malicious traffic in real time.An Intrusion Prevention System (IPS) sits inline on a network interface, actively inspecting transit packets against a comprehensive database of known attack signatures or behavioral anomalies. Unlike an Intrusion Detection System (IDS), which merely generates an alert when a threat is identified, an IPS actively intervenes by dropping malicious packets, resetting TCP connections, and dynamically updating firewall rules to block the attacking IP address.This technical guide delivers an end-to-end operational procedure to deploy, configure, test, and maintain Suricata—an enterprise-grade, high-performance open-source IPS engine—on a Kali Linux environment using automated packet filtering hooks (NFQUEUE).🧭 Architecture Overview: How an IPS Works InlineBefore deploying software, it is vital to understand how network packets flow through a Linux host configured as an IPS. In a standard setup, the operating system kernel handles packets automatically. To convert the system into an IPS, we must intercept this flow.Incoming Packet ──► [ Linux Netfilter (iptables/nftables) ] │ (Forward via NFQUEUE Hook) ▼ [ Suricata IPS Engine ] (Signature Verification/Rules) │ ┌──────┴─────┐ ▼ ▼ [ Packet Matches Rule ] [ Packet is Clean ] Action: DROP/REJECT Action: ACCEPT │ │ ▼ ▼ (Traffic Terminated) (Sent to Destination)By leveraging Linux Netfilter architecture (iptables), we instruct the firewall kernel to divert specified network traffic into a user-space queue (NFQUEUE). Suricata continuously polls this queue, processes each packet against its enabled ruleset, and passes a verdict (ACCEPT or DROP) back to the firewall.🛠️ Step 1: System Preparation and PrerequisitesBefore installation, update the underlying system packages to avoid dependency conflicts, verify active interface configurations, and ensure the necessary network libraries are available.1. Update Core Repository IndexesOpen a terminal shell as root or utilize sudo privileges to refresh the system package indices and upgrade existing modules:bashsudo apt update && sudo apt upgrade -yUse code with caution.2. Identify Target Network InterfacesDetermine the explicit naming convention of your network interfaces using the IP tracking utility:baship link showUse code with caution.Take note of the target interface names (e.g., eth0 for wired networks or wlan0 for wireless deployments).3. Install Required Netfilter DependenciesSuricata requires underlying core libraries to communicate efficiently with the Linux kernel firewall queue structures:bashsudo apt install build-essential libpcap-dev libnetfilter-queue-dev libcap-ng-dev -yUse code with caution.📥 Step 2: Installing SuricataWhile Suricata can be compiled directly from source code for advanced optimizations, installing it via official Debian packaging maintains system stability and simplifies routine security updates.1. Execute the Installation CommandRun the following package manager command to download and set up Suricata along with its built-in signature management utility:bashsudo apt install suricata suricata-update -yUse code with caution.2. Verify Successful InstallationConfirm the package installed successfully by checking the compiled application binary version and verifying built-in support for NFQUEUE:bashsuricata -V Use code with caution.Ensure the output indicates a stable build release and lists NFQUEUE within its enabled operational features.⚙️ Step 3: Global Configuration File Tuning (suricata.yaml)The primary configuration of the Suricata runtime daemon is managed within the unified YAML text file located at /etc/suricata/suricata.yaml. You will need to use a terminal text editor like nano or mousepad to update this file.bashsudo nano /etc/suricata/suricata.yamlUse code with caution.Modify the following critical structural variables to suit your local network landscape:1. Define Network Variable BlocksLocate the vars block near the top of the file. Update the HOME_NET variable to represent the internal network layout you intend to protect, and set EXTERNAL_NET to isolate external untrusted traffic.yamlvars: address-groups: HOME_NET: "[192.168.1.0/24]" # Replace with your local subnet range EXTERNAL_NET: "!$HOME_NET" # Any network that is NOT your home networkUse code with caution.2. Configure the Active Logging DirectoryEnsure the default output location matches standard system logging practices:yamldefault-log-dir: /var/log/suricata/Use code with caution.3. Enable Advanced IPS Mode StructuresScroll down to the outputs configuration block and verify that the Eve log entry engine is fully activated. The eve.json output produces structured telemetry optimized for ingestion into log forwarders and SIEM systems.yamloutputs: - eve-log: enabled: yes filetype: regular filename: eve.jsonUse code with caution.4. Set Up the nfq Engine ConfigurationFind the nfq sub-key block inside the configuration file. This instructs Suricata how to communicate with Netfilter packet queues. Ensure it is mapped correctly:yamlnfq: mode: accept # Default fallback option if a rule doesn't match repeat-mark: 1 repeat-mask: 1Use code with caution.Save your changes and exit the text editor (in nano, press Ctrl+O, Enter, then Ctrl+X).📚 Step 4: Loading and Updating Threat SignaturesAn IPS engine is only as effective as its signature intelligence database. Suricata uses a built-in updating application to pull down open-source threat rules compiled by the security community.1. Pull the Emerging Threats (ET) Open RulesetExecute the integrated updater tool to fetch the newest attack signatures, malware profiles, and exploit patterns:bashsudo suricata-update Use code with caution.This utility automatically compiles your download rules into a single comprehensive file located at /var/lib/suricata /rules/ suricata.rules.2. Inspecting Available Rule SourcesIf you wish to discover additional specialized threat categories (e.g., abuse tracking, botnet indicators, ransomware trackers), view the available source repositories:bashsudo suricata-update list-sourcesUse code with caution.✍️ Step 5: Creating Custom IPS Prevention RulesBy default, the majority of public signatures pulled via suricata-update are structured as standard alert rules (IDS behavior). To actively block threats, we can create custom drop rules that drop malicious packets instantly.1. Create a Dedicated Custom Rule FileOpen a new blank rules file to append your custom testing scripts:bashsudo nano /etc/suricata/rules/local.rulesUse code with caution.2. Write a Custom Drop Rule for ICMP Ping TrafficAdd a strict rule that drops any incoming ICMP echo requests (pings) coming from the outside world into your protected local machine:textdrop icmp $EXTERNAL_NET any -> $HOME_NET any (msg:"IPS BLOCK: Unauthorized ICMP Ping Detected"; icode:0; itype:8; sid:1000001; rev:1;)Use code with caution.Understanding Rule Components:drop: The action parameter. Instead of alerting, the IPS discards the matching packet completely.icmp: Protocol parameter applying explicitly to network control messages.$EXTERNAL_NET any -> $HOME_NET any: The directional path mapping traffic from external sources to your specified home network on any port assignment.msg: The descriptive string that will appear in logs when this rule triggers.sid:1000001: Signature ID. Custom rules must use a unique identifier above 1,000,000 to avoid conflicting with default systemic rules.Save and close the file.3. Link Local Rules to Main ConfigurationOpen /etc/suricata/suricata.yaml again, navigate to the rule-files: block, and ensure your new custom rule file is listed along with the main ruleset:yamlrule-files: - /var/lib/suricata/rules/suricata.rules - /etc/suricata/rules/local.rulesUse code with caution.⛓️ Step 6: Configuring Firewall Netfilter Hooks (iptables)Now we must configure the Linux system to pass network packets through the Suricata engine rather than processing them normally. We achieve this by adding iptables entries that forward traffic to NFQUEUE.bash# Redirect all incoming packets to Netfilter queue 0sudo iptables -I INPUT -j NFQUEUE --queue-num 0# Redirect all transit routing traffic to Netfilter queue 0sudo iptables -I FORWARD -j NFQUEUE --queue-num 0Use code with caution.Review Active RulesTo verify that your firewall traffic redirect hooks are properly layered at the top of your network stack, run:bashsudo iptables -L -v -n Use code with caution.You should see NFQUEUE num 0 listed as the first target action for both the INPUT and FORWARD chains.🚀 Step 7: Starting and Testing the IPS Execution EngineWith configuration paths set and firewall routing active, it is time to boot up Suricata in explicit IPS mode.1. Launch Suricata in Inline ModeExecute the operational service binary, directing it to read your main configuration file and process traffic from queue 0:bashsudo suricata -c /etc/suricata/suricata.yaml -q 0Use code with caution.Note: The -q 0 flag binds the engine process to the specific Netfilter queue matching our iptables commands.2. Verify Logging Output Real-TimeOpen a secondary terminal window to track the primary human-readable system events log output file:bashsudo tail -f /var/log/suricata/suricata.logUse code with caution.Look for lines stating Engine started and verifying that the NFQUEUE thread instances are successfully processing packets.🧪 Step 8: Executing a Penetration Attack SimulationTo confirm that the IPS configuration is working, we can simulate an attack from a separate target system or device located on your external network.1. Execute an Initial Attack (ICMP Ping Challenge)From an external computer on your network, attempt to perform a standard network ping sweep against your Kali Linux IPS host:bashping <KALI_IP_ADDRESS> Use code with caution.Observed Result:The external attacking device will experience a total timeout, receiving no replies. If you stop the ping command, it will report 100% packet loss.2. Verify IPS Enforcement in LogsReturn to your Kali Linux terminal and read the structured JSON log output engine (eve.json) to confirm that Suricata successfully identified and dropped the attack signature:bashsudo tail -n 20 /var/log/suricata/eve.json | grep "drop"Use code with caution.Alternatively, you can query the human-readable alerts output log directly:bashsudo cat /var/log/suricata/fast.logUse code with caution.You should see clear entries proving the IPS actively intercepted and neutralized the incoming connection:text05/26/2026-07:15:32.411082 [Drop] [**] [1:1000001:1] IPS BLOCK: Unauthorized ICMP Ping Detected [**] [Classification: (null)] [Priority: 3] {ICMP} 192.168.1.50 -> 192.168.1.15Use code with caution.🧹 Step 9: Reverting Changes and Post-Testing CleanupWhen you complete your testing, it is important to reset the Linux Netfilter tables. If you stop the Suricata service without flushing your firewall rules, your system will continue trying to push packets into a non-existent queue, completely blocking all internet access.1. Terminate the Suricata Engine ProcessIn the main window where Suricata is running, press Ctrl+C to cleanly shut down the detection engine threads.2. Flush Firewall QueuesRemove the forwarding entries from your firewall tables to restore standard kernel networking behavior:bashsudo iptables -F Use code with caution.📊 Summary Configuration ChecklistAction StepOperational CommandsKey Focus Area1. Install Core Servicessudo apt install suricata suricata-updateInstalls base dependencies.2. Update Signaturessudo suricata-updateDownloads the newest threat rules.3. Configure Enginesudo nano /etc/suricata /suricata.yamlSets up network variables (HOME_NET).4. Map RulesAdd drop syntax inside local.rulesDefines explicit blocking logic.5. Activate Firewallsudo iptables -I INPUT -j NFQUEUE --queue-num 0Intercepts packet flow at the kernel level.6. Run Applicationsudo suricata -c /etc/suricata /suricata.yaml -q 0Boots engine in active IPS enforcement mode.🏁 ConclusionConfiguring an Intrusion Prevention System like Suricata on Kali Linux provides valuable hands-on experience with defensive network security engineering. Transitioning an engine from a passive detection monitor (IDS) into an active inline prevention enforcement platform (IPS) requires precision at both the packet-filtering layer and the signature definition stage.By analyzing telemetry logs generated within eve.json and understanding how custom drop rules change packet routing, you can design highly resilient modern network perimeter defenses capable of mitigating advanced real-world attacks.

Stay Ahead in Tech

Get the latest ICT tutorials, DevOps guides, and AI news delivered directly to your inbox.