Jun 04, 2026
7 min read
A Complete Introduction to CSS Animation with Practical Examples
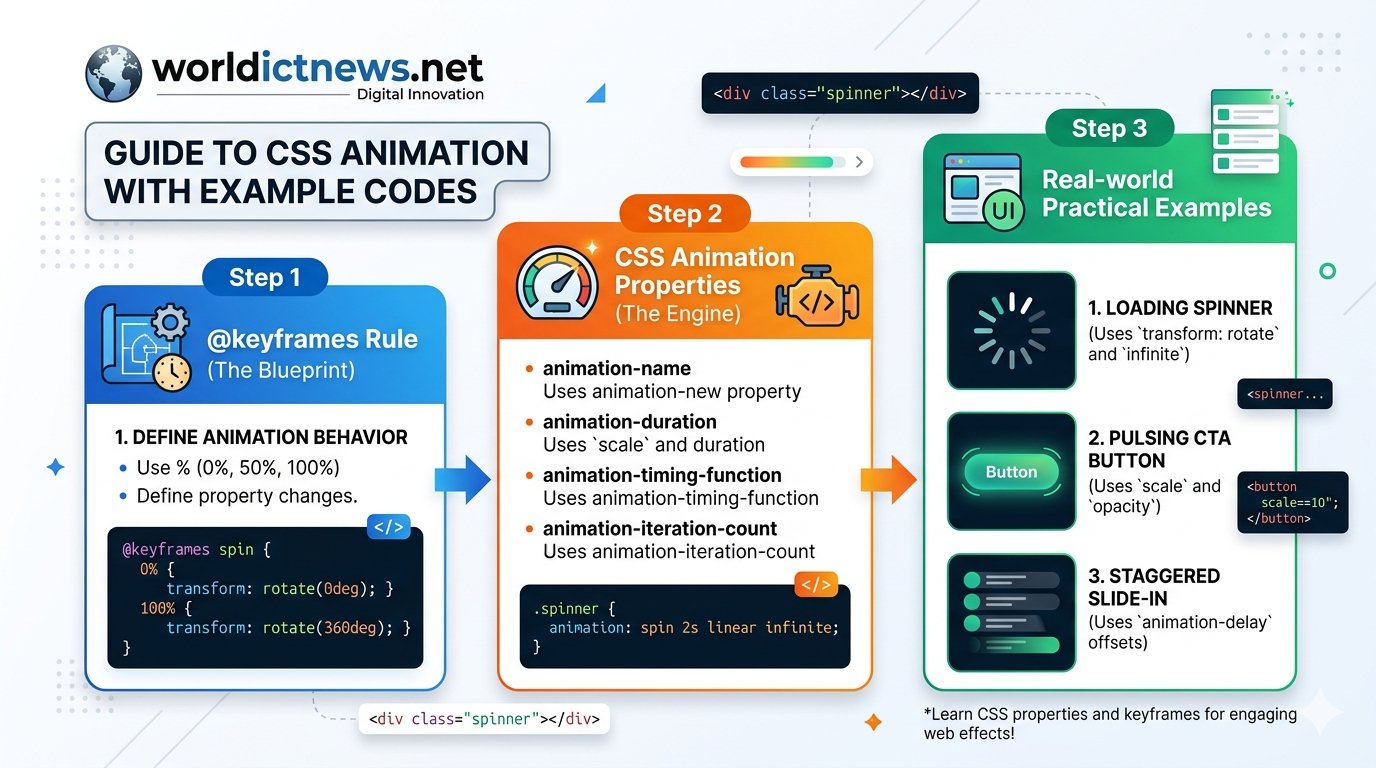
Mastering the Motion: A Complete Introduction to CSS Animation with Practical Examples. IntroductionIn the early days of web development, bringing movement to a webpage required heavy reliance on complex JavaScript libraries or resource-heavy Flash plugins. These methods frequently led to choppy performance, inflated file sizes, and poor mobile rendering. The introduction of CSS Animations fundamentally changed the web design landscape.CSS animations allow developers to transition elements from one configuration to another smoothly without touching a single line of JavaScript. By delegating animation rendering directly to the browser’s rendering engine—which can utilize hardware acceleration via the Graphical Processing Unit (GPU)—CSS animations deliver fluid, stutter-free performance.This comprehensive guide covers the core building blocks of CSS motion design. You will learn the mechanics behind the @keyframes rule, explore fundamental sub-properties, configure production-ready examples, and implement optimization strategies for modern websites.1. The Two Pillars of CSS AnimationEvery CSS animation relies on two interconnected components to function:The @keyframes Rule: The architectural blueprint of the animation. It defines the visual styles an element will hold at specific mathematical markers along a chronological timeline.The CSS Animation Properties: The engine configurations. Added directly to the target element's style block, these properties dictate how the blueprint executes (e.g., its speed, duration, repetition, and timing behavior).+--------------+| @keyframes Rule || (The Blueprint: 0% -> 50% -> 100%) |+---------------+ | v Applies to+---------------+| HTML DOM Element Class || (The Engine: Duration, Timing, Loops) |+--------------+2. Defining Keyframes: The BlueprintThe @keyframes rule establishes the states your element passes through during its animation sequence. You can specify these milestones using two distinct approaches.The Simple Approach: From/To SyntaxFor simple, two-state animations that move from a starting point to an ending point, use the from (0%) and to (100%) keywords.css@keyframes simpleFade { from { opacity: 0; } to { opacity: 1; }}Use code with caution.The Advanced Approach: Percentage SyntaxFor complex, multi-stage animations, use percentages. This allows you to break the timeline into precise increments, changing properties at various points along the way.css@keyframes multiStagePulse { 0% { transform: scale(1); background-color: #3498db; } 50% { transform: scale(1.15); background-color: #e74c3c; } 100% { transform: scale(1); background-color: #3498db; }}Use code with caution.3. Controlling the Engine: The 8 Sub-PropertiesTo run a @keyframes blueprint on an HTML element, you must configure its animation sub-properties. While short-hand methods exist, understanding the individual engine attributes is critical for fine-tuning motion.1. animation-nameLinks your target element directly to the unique identifier specified in your @keyframes rule.Example: animation-name: multiStagePulse;2. animation-durationSets how long the animation takes to complete one full cycle. It accepts values in seconds (s) or milliseconds (ms).Example: animation-duration: 3s; (Note: The default value is 0s, meaning no animation will occur unless this is explicitly set).3. animation-timing-functionControls the acceleration curve of the animation, dictating how it transitions through its keyframes.linear: Constant speed from start to finish.ease: Starts slow, accelerates quickly, then slows down at the end (Default value).ease-in: Starts slow, then accelerates steadily.ease-out: Starts fast, then decelerates smoothly.cubic-bezier(p1, p2, p3, p4): Allows you to author custom acceleration mathematical curves.4. animation-delaySpecifies a waiting period between the moment an element loads and the actual start of the animation sequence.Example: animation-delay: 500ms;5. animation-iteration-countDefines how many times the animation loop repeats. You can supply an exact integer or set it to run continuously.Example: animation-iteration-count: 3; or animation-iteration-count: infinite;6. animation-directionDetermines whether the animation plays forward, backward, or alternates between the two directions.normal: Plays forward from 0% to 100% (Default).reverse: Plays backward from 100% to 0%.alternate: Cycles forward, then backward on subsequent loops (0% \(\rightarrow \) 100% \(\rightarrow \) 0%).7. animation-fill-modeControls what styles are applied to the element before the animation begins (during a delay) or after it completes.none: No styles are applied outside the active timeline (Default).forwards: Retains the style properties of the final keyframe after the animation ends.backwards: Applies the styles of the first keyframe during an animation-delay period before execution.both: Applies both forward and backward rules simultaneously.8. animation-play-stateAllows you to pause and resume the animation dynamically, which is useful for user interactions like hover states.Options: running or paused.4. Practical Implementation: Code ExamplesLet’s apply these concepts to three distinct, production-ready design elements.Example 1: Creating a Loading Spinnerhtml<!DOCTYPE html><html lang="en"><head> <meta charset="UTF-8"> <title>CSS Loading Spinner</title> <style> body { display: flex; justify-content: center; align-items: center; height: 100vh; background-color: #f5f6fa; } /* The Spinner Container */ .spinner { width: 50px; height: 50px; border: 6px solid #dcdde1; border-top: 6px solid #2f3640; border-radius: 50%; /* Explicit Sub-Property Construction */ animation-name: spin; animation-duration: 1s; animation-timing-function: linear; animation-iteration-count: infinite; } /* Rotation Keyframe */ @keyframes spin { 0% { transform: rotate(0deg); } 100% { transform: rotate(360deg); } } </style></head><body> <div class="spinner"></div></body></html>Use code with caution.Example 2: Building an Attention-Grabbing Call-to-Action (CTA) ButtonThis example utilizes the shorthand animation property notation, combining name, duration, timing, and iteration rules into a single line.html<!DOCTYPE html><html lang="en"><head> <meta charset="UTF-8"> <title>Pulsing CTA Button</title> <style> body { display: flex; justify-content: center; align-items: center; height: 100vh; background-color: #1e272e; } .cta-button { padding: 15px 35px; font-size: 18px; font-family: sans-serif; font-weight: bold; color: #ffffff; background-color: #ffdd59; border: none; border-radius: 30px; cursor: pointer; box-shadow: 0 0 0 0 rgba(255, 221, 89, 0.7); /* Shorthand configuration: name | duration | timing | iteration */ animation: pulseGlow 2s ease-in-out infinite; } @keyframes pulseGlow { 0% { transform: scale(1); box-shadow: 0 0 0 0 rgba(255, 221, 89, 0.7); } 70% { transform: scale(1.05); box-shadow: 0 0 0 15px rgba(255, 221, 89, 0); } 100% { transform: scale(1); box-shadow: 0 0 0 0 rgba(255, 221, 89, 0); } } </style></head><body> <button class="cta-button">Join Now</button></body></html>Use code with caution.Example 3: Designing a Staggered Text Slide-In MenuBy using different animation-delay offsets on adjacent elements, you can create a sophisticated, staggered sequence where items slide in one after another.html<!DOCTYPE html><html lang="en"><head> <meta charset="UTF-8"> <title>Staggered List Animation</title> <style> body { display: flex; justify-content: center; align-items: center; height: 100vh; background-color: #2c3e50; font-family: Arial, sans-serif; } .menu-list { list-style: none; padding: 0; } .menu-item { background-color: #ecf0f1; margin: 10px 0; padding: 15px 40px; border-radius: 4px; font-size: 20px; color: #2c3e50; opacity: 0; /* Hidden initially before delay finishes */ /* Configuration using fill-mode to hold final state */ animation: slideIn 0.5s ease-out forwards; } /* Staggered Delay Intervals */ .menu-item:nth-child(1) { animation-delay: 0.2s; } .menu-item:nth-child(2) { animation-delay: 0.4s; } .menu-item:nth-child(3) { animation-delay: 0.6s; } @keyframes slideIn { 0% { opacity: 0; transform: translateX(-50px); } 100% { opacity: 1; transform: translateX(0); } } </style></head><body> <ul class="menu-list"> <li class="menu-item">Dashboard</li> <li class="menu-item">Analytics</li> <li class="menu-item">Settings</li> </ul></body></html>Use code with caution.5. Performance Optimization StrategiesWhile CSS animations are highly efficient, animating the wrong properties can cause performance drops, resulting in choppy frame rates on low-end mobile devices.The Browser Rendering PipelineWhen an element's style changes, the browser runs through three main rendering stages:Layout (Reflow): Calculates the size and position of elements on the page. Changing properties like width, height, top, left, or margin forces the browser to recalculate the layout for the entire document page structure. Avoid animating these properties.Paint: Fills in pixels, text colors, borders, and shadows. Properties like background-color, box-shadow, or color trigger paint operations.Composite: Organizes elements into distinct browser layers and draws them on screen.To achieve a buttery-smooth 60 Frames Per Second (FPS), limit your animations to properties handled entirely during the Composite stage:transform (Handles scaling, rotation, and translation calculations)opacity (Handles transparency values)Modern web browsers can offload these composite operations directly to the device's GPU, preserving main-thread processing power and ensuring highly fluid visual animations.ConclusionCSS animations provide a lightweight, high-performance toolkit for creating engaging user experiences. By mastering the relationship between @keyframes blueprints and your element properties, you can design everything from subtle UI micro-interactions to complex, staggered presentation layouts.As you design your animations, focus on hardware-accelerated properties like transform and opacity to keep your experiences fast, responsive, and cross-device compatible.